July 2024: 24" Starmaster adoption and modifications
All text and images copyright Michael E. Lockwood, all rights reserved unless otherwise noted.
John Pratte recently completed a 25" f/3.2, and the primary mirror was made from a blank he had that was mostly spherical and needed to be figured into a parabola. I did that, and by some turn of events John sold the telescope, delivered it, and ended up with three telescopes!
When I heard he had a 24" f/3.7 FX Starmaster with my optics in it, my ears perked up. I'll explain one of the reasons for this in a future article, but the other reasons were to give it a good home and to have two sets of drive system parts so that I had spares for my 20" f/3.0 if something failed, and then I could update the drive system on one of the Starmasters.
As a bonus, I ended up with more aperture prior to building some large-aperture telescopes for myself.
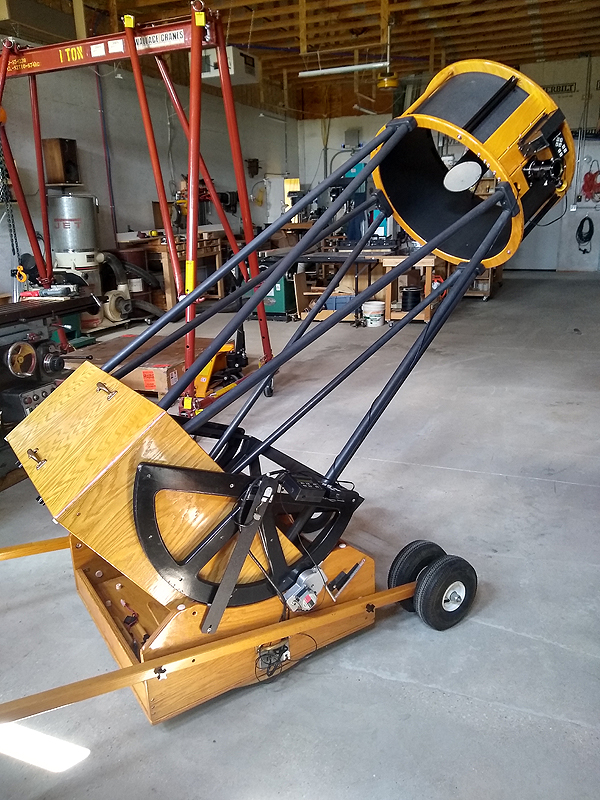
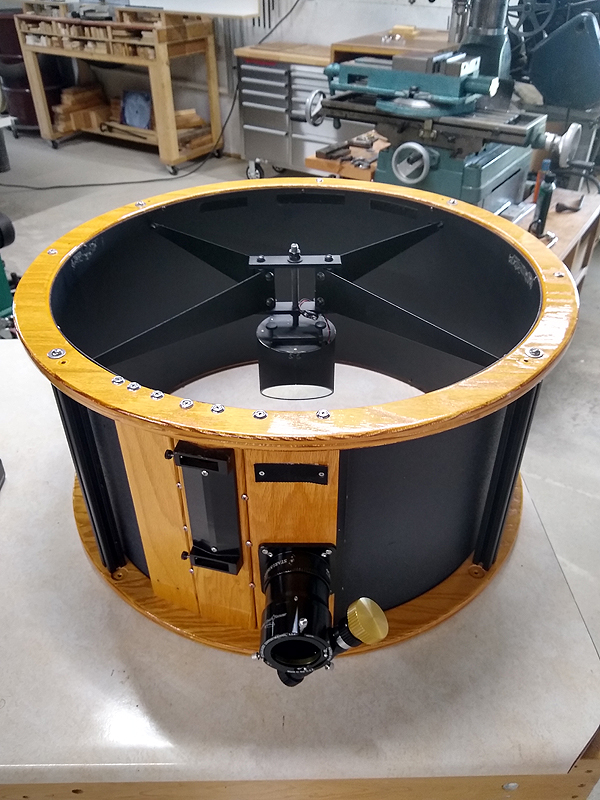
John dropped off the telescope in May. The photo at right shows it after I finished up most of my initial modifications which I will detail below.
I had been told that the telescope had some issues with the images, and that stars were line-shaped. I expected a pinched secondary or an issue with the mirror cell, but everything looked good. The secondary mirror was packed with the proper amount of batting, so there was no issue there. I did remove the two fans behind the primary mirror that were of course in a line (the only shape you can do with two fans), and I did not use the corner fans so that cooling could not be the issue.
I gave it a shakedown on the first clear night that I could. Everything worked properly, and we had fun with visual and then nightvision viewing on one very nice evening. Stars were pretty much round, and I concluded that some strange mirror pinch and/or the cooling fans were to blame, or perhaps rotational oscillation of the secondary mirror and conventional spider were causing lines when the wind blew and the spider vibrated. Whatever it was, I couldn't duplicate anything close to it, so I resolved to keep the telescope and make some tweaks and improvements.
First, I wanted to stiffen the diagonal cage. The only struts between the wood rings were four wooden dowels that the spider mounted to, and they were bending under the spider tension. Later on, as Rick built faster telescopes such has the f/3.3 Super FX (SFX) line, he modified his design to use metal tubes, such as those in my 20" f/3.0 MX Starmaster, but this telescope was vintage 2008.
I decided to build an offset spider, and I simply cut the vanes off of the spider hub and bolted them to two short pieces of 1" square 80-20 aluminum extrusion using T-slot hardware. This is dead simple and easy. While I did machine the two pieces of extrusion to the same length, careful cutting is sufficient. The center holes in the extrusion are tapped to 1/4"-20 thread, and then they were bolted together with two short pieces of 1/4"x1" aluminum.
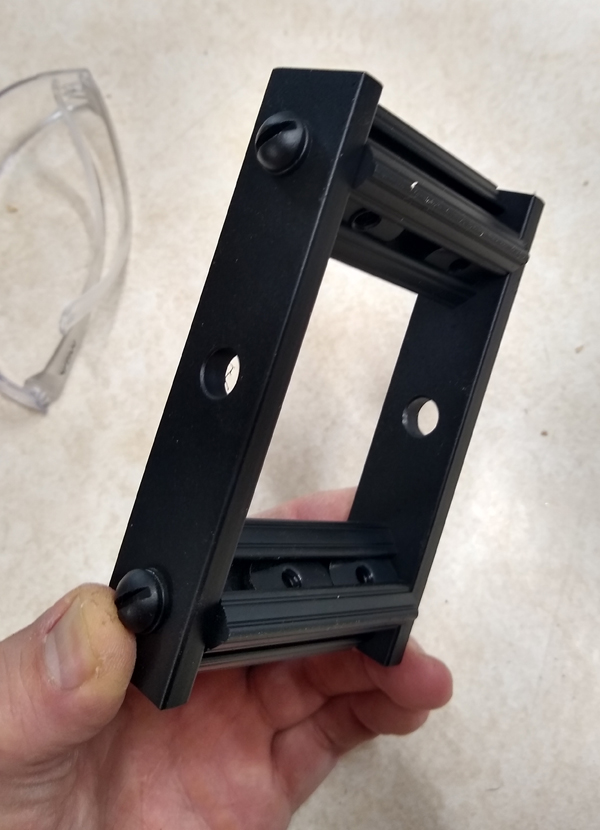
 The new secondary "hub" is seen in the
photo above at left. The hole in the aluminum bars is for the 3/8" mounting
stud for the secondary holder. Note the t-nuts already in the slots in the
extrusion, which accept the bolts that hold the spider vanes on. This
is seen in the photo above at right.
The new secondary "hub" is seen in the
photo above at left. The hole in the aluminum bars is for the 3/8" mounting
stud for the secondary holder. Note the t-nuts already in the slots in the
extrusion, which accept the bolts that hold the spider vanes on. This
is seen in the photo above at right.A sharp-eyed reader might note that the hub is larger than the secondary, and this is true, because the 4.5" secondary is going to be bumped up to a 5.0" secondary in the very near future, so I made the hub with that in mind to just fit into the shadow of that larger secondary.
I moved the dowels that formerly served as the four struts in the cage to locations near the truss pole attachment points to help stiffen the cage, and I installed new struts made of the 1" square, black anodized 80-20 extrusion at the proper locations for the offset spider vanes. This extrusion comes in a variety of sizes, from 1" to 3" square and rectangular, and has t-slots on all sides. The center is hollow and can be tapped to accept a bolt. The the 1" extrusion has the hollow sized properly for 1/4"-20 threads, so it's simple to run bolts through the wood rings and straight into the metal.
Two of those pieces of extrusion are seen in the photo above at right. This allowed significantly more tension to be applied to the new spider than with the old wood struts, making it very stiff, and I think they look great and blend in nicely with the other cage hardware. One could insert t-nuts into the slot to attach finderscopes, etc., to the cage quite easily.
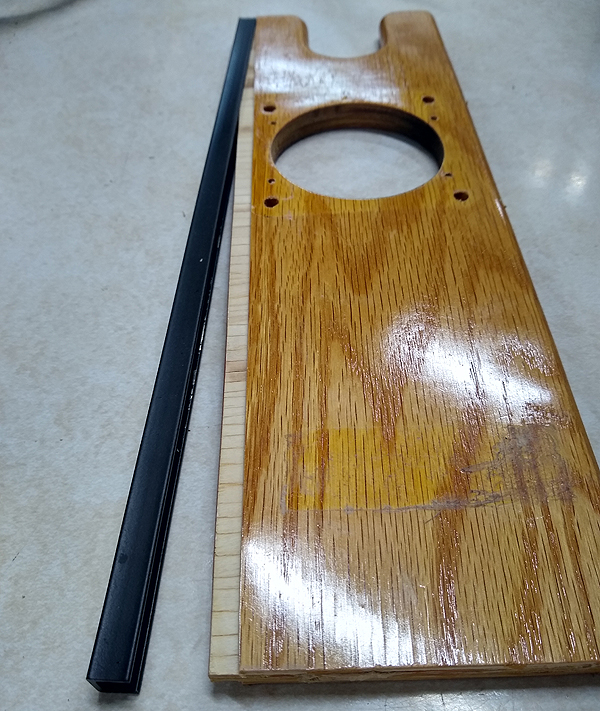
I find the focuser boards a bit thin for my taste, and I had planned to update the board on my 20" f/3.0. However, I came up with an interesting idea looking through my scrap metal bin. The focuser board was reinforced on one side by wood but not the other, so I added a small piece of aluminum extrusion to stiffen the side that needed it.
I ran the focuser board on edge through the tablesaw, alternating top and bottom side against the fence, slowly bumping the fence until the thickness of the wood at the edge just allowed the extrusion to press-fit onto it. By cutting both sides away on the saw, it ended up exactly centered on the board. It fit very snugly, and then I secured it with screws into the edge of the board. It's the same width as the wood, so it was a perfect use for it and it looks like it should be there.
This resulted in a lot stiffer focuser board with just the addition of a small piece of aluminum, and I declared victory. I actually have a piece of aluminum that I can machine to replace the wood focuser board on my 20" f/3.0, but I'm not sure if that will be necessary now because I have more of the aluminum extrusion.
The focuser board is shown above at right with the extrusion just slipping onto the "tenon" that I made at the edge of the focuser board. I applied some polyurethane on the bare wood, and then screwed on the aluminum piece.
My last idea was to remove some of the azimuth "slop", or flexure, that I could feel when moving the telescope in azimuth while pointed near the horizon. I noticed this particularly while scraping the southern summer Milky Way for H-alpha objects with the nightvision setup. I determined that some of the flexure was coming from the way the baffle board that the truss poles attached to was attached to the inside of the mirror box, so I removed the thin L-brackets and replaced them with 1/4" thick aluminum L-brackets that I had left from my solar power install. I drilled holes in the aluminum for screws and secured them to the mirror box walls and truss baffle. The improvement in rigidity was noticeable immediately. (I'll try to add a photo of this in the future.)
The last tweak was to reinforce the upper end of the side bearings, which I could see flexing with azimuth movement. I added another attachment point higher up on the mirror box for the bearings and drove in the new screws there. Then I reinforced each with a strip of plywood that ran along the top of each bearing and connected to a brace that I attached with bolts to the lower board of the mirror box. This is seen in the photo below, and it has completely eliminated any flexure of the bearings themselves, resulting in an even large reduction in "slop" or flexure as I made small moves in azimuth.
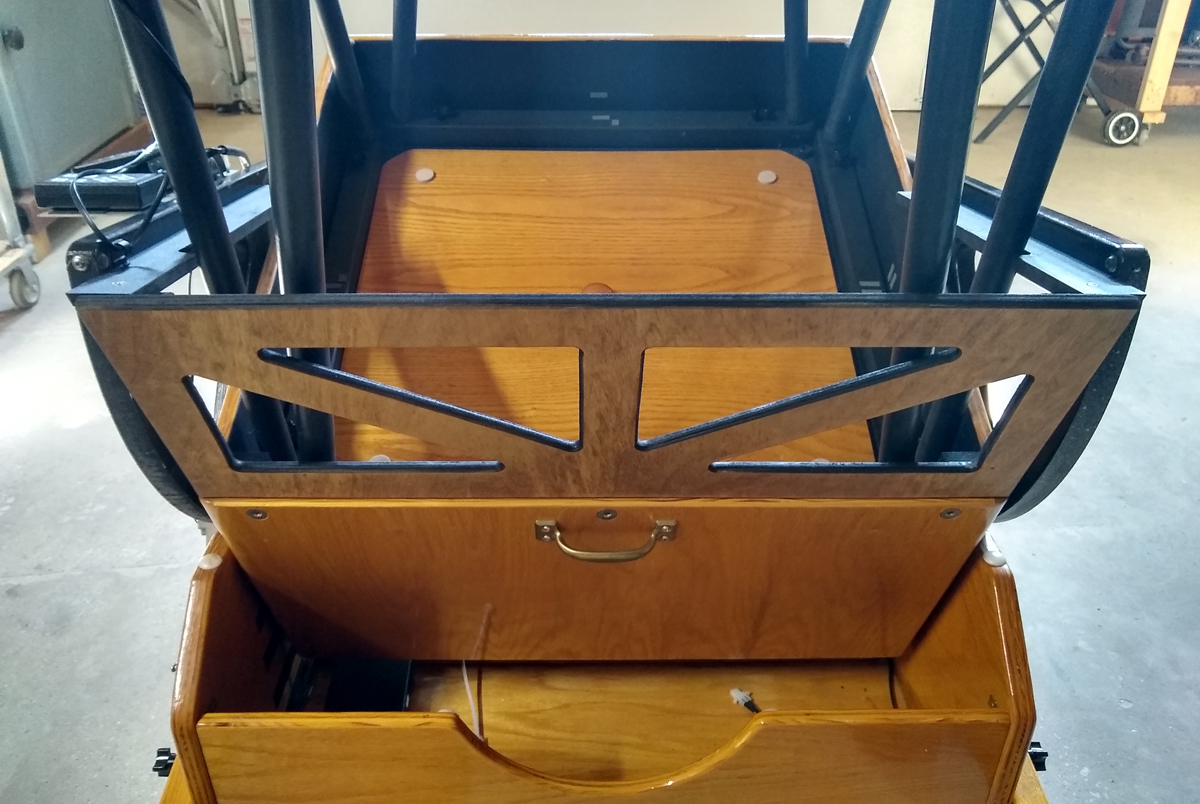
As a bonus, I realized after this was done that I could mount a fan on top of the brace in the center, out of the light path, that could be directed at the front face of the primary mirror to help it cool on both front and back. At some point I'll add a single, large fan to the rear of the primary to cool it symmetrically.
After all of this was done, I removed the old focuser and installed a SIPS that I had on hand. I had bought two SIPS units a LONG time ago for future telescopes, and this was the perfect place to use one.
I have finished the change from the 4.5" m.a. flat to a 5.0" m.a. quartz flat as of late July. I built the spider and positioned it with the 5.0" secondary in mind so that it would butt up against the spider using a shim washer or two, so that swap was simple after I made the holder from a shell and an aluminum disk. The washer against the spider completely prevents the 3/8" secondary holder stud from flexing.
Final modifications will include repainting the mirror cell (which is peeling badly for some reason), fitting of whiffletree/roller arms (as seen in this article), and the installation of a Nexus DSC and new wiring harness that I already have on hand. The Nexus swap should also be simple. The mirror cell, however, will be far more involved, and will likely be a winter project.
I'm very pleased to own a 24" f/3.7 FX Starmaster in addition to my one-of-a-kind 20" f/3.0 MX. I know that Rick would ask me (possibly using some colorful language) why I modified his telescopes, but I think he'd understand after he saw the results and we sipped a little bit of whiskey and talked about it.
I'm just modernizing a classic. I think others would agree.
I sure do miss Rick, he was one of a kind.
Please check back for future installments of "In the Shop".
Mike Lockwood
Lockwood Custom Optics
