Why
aren't my
stars round?
How to figure out what is wrong with your telescope when stars appear distorted (updated Aug. 2016)
All images and text Copyright Mike
Lockwood, 2016
So you've had a telescope for a while, or just gotten a new one, and you notice consistent or inconsistent distortion in the star images. To put it another way, stars aren't round in the eyepiece inside or outside of focus, or maybe even at best focus. This may be intermittent, or may always be the case. How do you figure out the source of the distortion? Is the problem mechanical, or are the optics flawed? I hope this article is helpful in leading you down a path that will lead to an explanation.
There are many possible causes of distorted, non-circular star shapes. You may even be seeing more than one distortion on top of another one or two! This can make deciphering the puzzle a bit difficult, but hopefully this article will allow you to identify one problem fairly easily, and then after fixing it you will be able to track down the other.
In order for this article to make sense, first we have to set some ground rules and satisfy a few conditions before we can move into diagnosis of the problem(s).
First condition: For all of the advice to follow, please put the star in the center of the field of view and keep it there. This is important for determining if the issue is due to collimation, and reduces the chance of some other eyepiece or corrector aberration being confused with another issue.
Second condition: Before you do anything else, determine if you have astigmatism or other distortion in your eyes. This is fairly simple - if the stars in the telescope do not appear to be round, tilt/turn your head. Distortion in star images that is caused by distortion in your eyes will rotate with your head. You may even already know from your eye doctor that you have astigmatism. However, if you don't rule out this problem first, you may drive yourself crazy trying to figure out what is going on!
Third condition: Next, take a look at what power you are using - if it is fairly low, the distortion may be coming from the pupil of your own eye vignetting the light cone. Move your eye side to side while looking at a focused and defocused star - if the shape changes or the secondary shadow appears to move around, your own pupil is blocking some of the light and may be causing the strange shape you are seeing. In this case, either 1) keep your eye carefully centered over the eyepiece, 2) raise the power, and/or 3) get more dark adapted so your pupil is larger and does not block the light cone. If you are already using high power, you may wish to try low power to see this effect for yourself and know what it looks like. Your friends will thank you when you point this out to them.
Fourth condition: If it's early in the evening, understand that your mirror will likely be cooling off, and strange things can happen. Air currents can form, cooling parts of the mirror faster than others. A breeze can set up asymmetric airflow in the telescope's tube or mirror box, also cooling some of the mirror faster than the rest. Both of these are a recipe for strange star shapes that go away after a bit of cooling. This goes for the primary mirror and/or the secondary, especially if it's fairly large.
Fifth condition: For this article, we are assuming that your mirror cell is properly designed and set up, including the edge support of the mirror. If your optics are glued to the cell, then you cannot easily rotate them to help rule out some possible causes of non-round stars. Gluing a mirror (other than a small secondary) to a cell made of something other than glass will often cause it to warp as the cell shrinks by a different amount and pulls on the mirror, creating optical problems. I do not recommend gluing large mirrors to their cells/holders, as it will often cause non-round stars. If your primary mirror and or large secondary mirror is glued to something, I recommend finding a way to mount it without glue, and then coming back to this article if problems remain.
Now, understanding the possibilities given above, let's begin.
Collimation and coma in a Newtonian telescope
 By
far the most
common reason for non-round stars in a Newtonian telescope is poor
collimation. This produces an optical aberration called
coma.
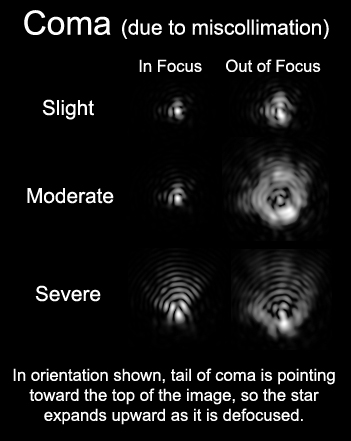
Some examples of the appearance of coma in images can
be
found in the diagram to the right. Keep in mind that coma may
be
combined with other optical problems.
By
far the most
common reason for non-round stars in a Newtonian telescope is poor
collimation. This produces an optical aberration called
coma.
Some examples of the appearance of coma in images can
be
found in the diagram to the right. Keep in mind that coma may
be
combined with other optical problems.With severe coma, stars appear distinctly comet-shaped. With less severe coma, stars still appear asymmetric at or near focus, a characteristic that we will use to our advantage.
If you don't know what coma looks like, remove the coma corrector from your telescope if you are using one, put in a high-quality eyepiece, move the star around the field, and see coma for yourself.
With no coma corrector in place, a star placed precisely in the center of the eyepiece's field of view shouldappear round if the telescope is collimated properly. If it is not, there will be a spot somewhere else in the field where the star appears round. This is because a Newtonian telescope will produce a perfectly round star image at the center of the field if it is collimated properly.
However, if the telescope (without coma corrector) is moved so that the star is moved to the right of the center of the field of view, you will see the star start to bulge, or it may appear to grow a tail that points toward the right. Likewise, on the left of the center of the field of view, the bulge or tail will point to the left. In fact, no matter where the star is, the bulge/tail will always point away from the center of the field, except at the exact center of the field, where the tail does not exist. Move the star around the field and observe this effect. You will see more coma the faster the telescope is.
Defocus the star in both directions - inside and outside of focus. Coma will remain on the same side of the star and will not reverse on the other side of focus. Other distortions such as astigmatism or pinched optics will appear to rotate or flip on the other side of focus.
Now that you know what coma looks like, I will describe how I collimate a telescope. First, though, here are some points that I need to make.
1) NOTE: IF YOU SPEND AN HOUR OR TWO LEARNING THE COLLIMATION TECHNIQUE DESCRIBED BELOW, YOU MAY IMPROVE YOUR TELESCOPE'S IMAGES GREATLY WITHOUT HAVING TO SPEND A CENT ON NEW COLLIMATION TOOLS. You will also have a sharper eye for collimation than most other observers.
2) NOTE: Lasers can easily go out of alignment, and this will seriously throw off telescope collimation. Put your laser in the focuser and push the top of the laser against the top of the focuser. I don't usually tighten the thumbscrews, because they often tilt the laser within the focuser. Now rotate the laser in the focuser (you can also do this in a v-block). If the laser spot moves in a circular path on the mirror, then the laser needs to be aligned. Consult a knowledgeable astronomer or the manufacturer to get help with this. Also, rack the focuser in and out - the laser spot should not move. If it does, the focuser has issues.
Relating to the focuser, here are some other mechanical tips:
Do all of your collimating with the focuser racked all the way in and then backed off the slightest bit so that the stops are not putting pressure on the drawtube.
Make sure the focuser base is snug on the focuser board. Next check the focuser attachment to the base plate - if the focuser is not seated firmly on the base it may shift a bit. You can loosen the two setscrews that hold the focuser in the base and remove it. Clean the base of the focuser and top and inside of the base plate so make sure that no grit is in there. Put the focuser back in the plate and press it firmly against the plate while re-tightening the two setscrews. Additionally, for the SIPS, when doing initial positioning tighten the focuser and locking ring as a unit - you will get a better connection.
Clean the top of the focuser drawtube and the underside of the lip of the laser collimator. These two surfaces meet when the laser is inserted. Push the laser against the focuser - that makes it contact against two machined surfaces and should align the laser and focuser axes. You can spin the laser in the focuser, maintaining a little pressure to keep the laser against the top of the focuser. As I said above, the dot should not move when the laser is rotated, though it may oscillate a little bit.
When you gently tighten one thumbscrew, make sure the laser dot doesn't move. If it does, the thumbscrew is tilting the laser in the focuser tube, and this will throw off your collimation. Sometimes I don't tighten the thumbscrew at all. Sometimes I gently snug up one or the other or both. It depends on the fit of the laser in the focuser, and this can be different for every laser and focuser! Get to know yours, and know what you have to do to have the laser not moving around in the focuser tube while also not having the collimation thrown off.
3) NOTE: Using only collimation tools - laser, barlowed laser, cheshire, autocollimator, etc., I almost never achieve perfect collimation. That is, I can almost always detect some coma in a star image using the technique described below. So, I always finish up collimation using a star image, and that is what I will describe here.
With those points in mind, we can now start collimating.
Go through your normal collimation procedure, without a coma corrector, paying particular attention to making the secondary mirror alignment as close to perfect as you can get it. Let's call this "rough collimation", and many people don't do anything further after it, but we will. You will probably use a laser for this process. If you need help with this, seek help elsewhere or from a friend. If you can nail the secondary alignment, the instructions below will then help you get close to perfect primary and system collimation.
From here on, we begin "fine collimation", done using a star image, a technique that I have used for many years.
Put your coma corrector back in the focuser if the telescope is f/5 or below. Put in a fairly high-power eyepiece, put a star in the center of the field of view, and keep it there using a drive or by hand-tracking.
But wait, why are we using the coma corrector? Aren't we supposed to collimate without it? The answer is yes, but only when using a laser. We SHOULD use the coma corrector it for "fine collimation", which done using a star image.
Using the coma corrector will correct, or cancel, nearly all of the coma that the telescope would normally have without it. However, if the primary mirror is not collimated properly, residual coma due to mis-collimation will still be seen even with the coma corrector in the focuser, so we can still see the coma and work to remove it. Using the coma corrector makes it much easier to see the residual coma that we need to get rid of in the "fine collimation" process.
Keeping the star centered, defocus the star slightly inside then outside of focus. Do it slowly at first, then rapidly. Star testing like this is most sensitive when you are very close to focus, so don't defocus by a large amount. You should just start to see the secondary shadow emerge at most. If you see it distinctly, you have probably defocused too much. This will require only a fraction of a turn of the fine-focus knob.
Pay attention to how the star expands, and be critical. Looks for small variations. Let's say that the star appears to "bulge" on one side on the inside of focus, and the "bulge" is still on the same side as you look at the image slightly outside of focus. This is likey a small amount of coma that needs to be addressed by tilting the primary mirror a small amount. (Pinched optics, or other distortions of the mirrors will usually "flip" on the other side of focus, thus distinguishing them from coma.)
If coma is not obvious, then the collimation is fairly good. In this case, we need to get more critical. Don't just look at the shape of the star after you defocus it - observe how the star expands. That is, as you just barely start to defocus the star, watch to see if the star image expands first in a particular direction, or "bulges" in that direction. In doing this, we're looking to see HOW the star expands, not what it looks like when it's expanded. It is subtle at first, but more obvious with practice. Doing this very close to focus increases the sensitivity of the test.
To help with this, note the location of the star at best focus, and stare at that spot. Now defocus inside of focus and see if the star simply expands in all directions at once, or if it "bulges" or "pulls" in one direction, expanding off-center. Repeat going outside of focus. If you see the bulge in the same direction as going inside of focus, repeat by defocusing in both directions a few more times to confirm that it is consistent and is not a strange air current or moment of bad seeing. If it is consistent, chances are it is coma.
Practice looking for small amounts of coma. You will get better with time and practice, and small amounts of coma will become obvious to you.
Now, if you see coma, either a lot of it or a little, use the primary's collimation adjustments to move the star toward the tail of the coma, which is in the direction of the bulge that you see when defocusing. This may be easier if you have a friend helping you by turning the collimation bolts as you direct him/her to. Using the primary's collimation adjustments to move the star tilts the mirror so that the optical axis (the spot where a star will appear round even with no coma corrector being used) gets closer to the center of the field of view of the eyepiece. By making successive adjustments, you can put the coma-free spot in the center of the eyepiece's field, and then the telescope is nearly perfectly collimated.
NOTE: If you are working alone, I recommend first turning each bolt in both directions and making a "map" of how each one moves the star in the eyepiece. Then you can be sure of turning the right bolts to move the star where you need it, saving time and frustration.
ANOTHER NOTE: If you can't distinguish the direction of the coma, or if the distortion does not seem to resemble the description of coma, you may have more than one optical issue. The other issues may need to be fixed before you can more accurately collimate your telescope.
Keep making adjustments until the star expands uniformly in all directions, and does not "bulge" or "pull" in one direction. At this point your telescope will be fairly well collimated in terms of the primary's tilt, and you're ready to observe.
Check collimation by this method throughout the night to see if it drifts, and tweak if necessary. It is important to note that the collimation of the telescope may shift subtly or obviously as the scope is used throughout the night and/or as it is moved up and down in altitude. These adjustments may be required more than once each night to ensure optimal telescope performance. They do pay off, particularly for planetary images.
If you master this collimation technique, please tell your friends where you saw it, and teach it to someone else.
A little history - I learned star collimation out of necessity. Before I had really good lasers, etc. as alignment tools, it was the only satisfactory way for me to nail the collimation of the fast telescopes that I was using and show what the telescopes could really do. (It is also the final step in collimating a classical Cassegrain, of which I have built a few.)
I mainly used lasers because I found myself adjusting collimation after dark, making an autcollimator difficult to use. So, over time I moved away from the autocollimator and toward newer, higher quality lasers that were accurately machined and held their own collimation accurately over time.
Lasers have improved greatly (thank you Howie Glatter and others), but still there are errors introduced by imperfect tools, the fit of the tool in the focuser, and other small errors. No tool is perfect, but some are better than others. So, the only method that avoids all of the errors is final collimation using a star.
The method is self-regulating - on a night of poor seeing, if you can't see the collimation error in the moving star image, it doesn't really matter - the atmosphere is not going to reveal that level of detail anyway. On a night of superb seeing, however, you are far more likely to see errors in a star test after tools/lasers are used, and that is when knowing how to tweak the collimation by the last little bit using a star will allow those small errors to be removed, and the utmost in performance can be reached. That is when the magic truly happens.
I can't count the number of times at the WSP when I would be up on the ladder at Joe's 32" f/3.6 and I would see some collimation error. This is due to changing temperatures and the imperfect structure of the telescope. I would tell him what knob to turn, and images would improve. Over time he just learned which way to turn the vertical adjustment knob, and began to work on finding the sources of error. While a barlowed laser gets the 32" collimated reasonably well, it is still normal to have to tweak by using a star image.
Pinched optics
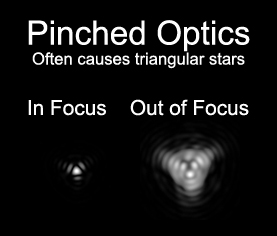 Pinched
optics means that the mirror is being squeezed by something.
Generally, since three points can locate a mirror laterally,
the effect of the "tightest" three screws are what is
seen, and that means a three-sided shape is created by the mechanical
distortion, which of course is a triangle. However, by
squeezing the mirror on two opposite sides, I have seen highly
astigmatic images created by pinched optics.
Pinched
optics means that the mirror is being squeezed by something.
Generally, since three points can locate a mirror laterally,
the effect of the "tightest" three screws are what is
seen, and that means a three-sided shape is created by the mechanical
distortion, which of course is a triangle. However, by
squeezing the mirror on two opposite sides, I have seen highly
astigmatic images created by pinched optics.Pinched optics have to be pretty bad to make a star look like a triangle, but it happens! The figure at right shows how star images may appear if one of the optical elements is pinched. More than likely you will only see a hint of triangularity over a basically circular shape. Chances are that it is being cause by an optic that was pinched during manufacturing or that is being pinched in the telescope. While it may seem minor, you will want to track it down because it may become worse at various temperatures, since metal and glass expand at different rates, and the glass may be more severely pinched at temperature extremes.
First, inspect the mounting of the primary mirror. All clips and other retaining screws should not contact the mirror, but they should come close. If you find a screw tightened against the mirror, even a small amount, back it off and re-test. You should be able to "rattle" the primary in the cell. It should not be "snug" in the cell, it should be slightly loose in all directions.
If no optics appear to be pinched, then rotate the primary. If the "points" of the triangle rotate with the mirror, chance are the mirror was pinched during manufacturing. In this case, let the mirror cool after it is rotated and observe the star shape an hour or two later. If the points of the triangle go back to the original orientation, then the triangularity is likely being cause by cooling, such as by three fans or three ventilation holes.
If the distortion does not rotate with the mirror, then it is possible that the primary mirror's cell is distorting it. If the issue is poor edge support, then the problem will likely disappear if you point the telescope straight up and ensure that the primary is not "stuck" against the edge supports. Giving the scope a quick shake (thereby "rattling" the mirror in its cell) will often cure that. Moving the scope back down near the horizon would then cause the problem to return.
Often mirror cells have only three edge supports, and if the mirror is heavy enough, it can effectively become wedged between the two bottom supports when the telescope is pointed low, and this squeezes the mirror. (If the mirror is 10" or larger, I don't recommend a three-edge-support cell.) This will cause triangular star images and/or astigmatism as the telescope is pointed low in altitude, and it may improve if the scope is pointed high. The mirror may also get "stuck" a little bit and may remain pinched until it is "rattled" in its cell.
Some mirror cells may actually pinch the mirror from time to time, due to friction/stiction. That is, if the mirror sits on the cell for a long time, some of the contact points (plastic, fellt, cork) may actually adhere to the mirror. The solution is simply to move the mirror in the cell, or rotate it slightly, just enough to break the stiction, and get it "un-stuck". This may result in a significant improvement in the star test, and I have seen it cure a major problem in a couple of cases.
Finally, check to see that the primary mirror is resting on all of its rear support points and triangles. Occasionally part of a cell may bind up, or a part of a bolt or pin may push one or more triangles higher than the rest, preventing the cell from hitting the back of the mirror at all support points. Touch the back of the corner of each triangle and see if it moves. The mirror should exert equal pressure on each of the cell's back support points, so if you find a triangle or part of a triangle that is not touching the primary, that is a major problem, even if it's only missing touching by a tiny amount. Problems like this are one reason why people test telescopes before delivering them to customers. They are difficult to see without something approximating a mirror (a disk with a very flat back) actually sitting in the cell, verifiying that all clearances are correct.
It is possible to have the secondary cause triangular distortion, but it is not common. As a last resort, examine its mounting and see if it is being pinched. Like all optics, it should be held gently, and not glued unless done by an experienced person.
 What is
astigmatism?
What is
astigmatism?
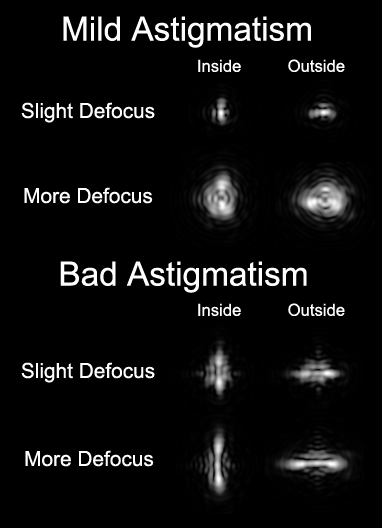
Astigmatism
is an optical aberration. Mirrors with astigmatism produce
oval-shaped, or in terrible cases, line-shaped stars! The
oval or
line rotates 90 degrees as the eyepiece is moved to the other side of
focus. In mild cases, stars still generally appear round at
focus, though diffraction rings, if they are visible, may appear
distorted. In severe cases, the star will appear cross-shaped
at
focus. The figure above right shows what astigmatism may look
like in a telescope.Primary mirror astigmatism - polished in, and thermal
If you notice astigmatic star images, the first step is to note the orientation of the "ovals" on the inside and outside of focus. Make sure that you record this with respect to the telescope's optical axis, and not the ground. That is, note the orientation of the ovals and which side of focus you are on with respect to the tube of the telescope, not the ground. I tilt my head so that it is aligned with the tube - that is, an imaginary line drawn between my eyes will be parallel with the telescope tube.Now, rotate the primary mirror. If the astigmatism rotates with the mirror, then the primary mirror is causing the astigmatism. HOWEVER, you must now observe the astigmatism over several hours to see if it changes or goes back to its original orientation. If the astigmatism goes back to its previous orientation over time, then chance are that you are seeing THERMAL astigmatism, likely caused by unevenly cooling the mirror.
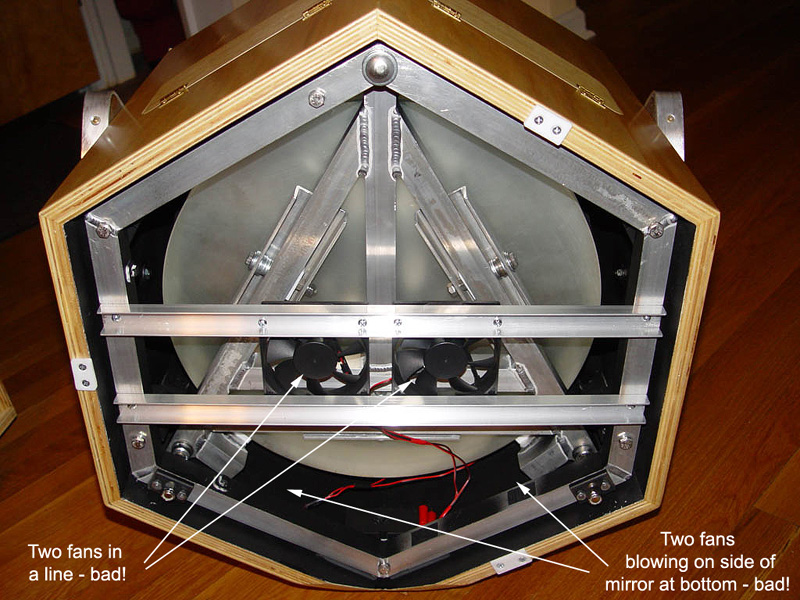
Thermal astigmatism may appear or disappear only on windy or still nights, so more than one evening of testing may be required. If you see a pattern, look at how the cooling fans are positioned or the air flows through the mirror box due to wind. Having only the bottom of the mirror box open at the back may cool the bottom half of the mirror more, causing uneven temperature. Having fans in a line rather than distributed around the mirror is also a usual suspect. The figure below shows how I poorly located the fans in a 16" f/4 telescope that I built some time ago.
In all cases, though, thermal astigmatism will appear to rotate with the primary at first, but then it will eventually change or go back to its original orientation. If the astigmatism always follows the rotation of the primary on all nights and over many hours, it is being caused by the primary mirror itself.
One form of thermal distortion that does not rotate with the primary mirror is the effect of an air current. It will typically distort one side of a star image, but the effects can range from minor to severe depending on the temperature differences involved. It should be recognizable in out-of-focus star images as a slowly moving, distorted area on one side of the image. In some cases, it may be much worse. A closed tube will make it worse, and pulling up the shroud on a truss-tube dob may help alleviate it and aid in primary mirror cooling. It may also become less apparent as the mirror cools over time.
It is also possible for a secondary mirror to show thermal astigmatism while it cools. This is because the back of the secondary mirror, and the sides somewhat, are usually insulated by the holder, while the optical surface can cool. This astigmatism will go away as the secondary mirror reaches equilibrium. Lastly, an over-active dew heater on the back of a secondary can also cause astigmatism. Try turning off the heater and see if the problem goes away.
Mirror-cell induced astigmatism; Overheated, pinched and bad secondary mirrors
Let's assume now that you have checked, and the astigmatism does not rotate with the primary mirror.If the ovals (defocused star images) appear roughly aligned with the tube of the telescope, that is the oval on one side of focus is aligned with the tube and on the other side of focus it is perpendicular to the tube, then the likely culprits are a bad secondary mirror or the edge support of the primary mirror. Tilting your head parallel or perpendicular with the tube while looking at a star image can help you determine if the astigmatism is aligned with the tube.
It's pretty obvious, but we call this alignment with the optical axis because the optical axis is parallel to the telescope tube. We also call this alignment with gravity because the force of gravity can cause astigmatism that is aligned with the optical axis/telescope tube.
A mirror cell that is causing astigmatism usually has inadequate edge support, such as a bad sling or poorly selected contact points. It will pinch the mirror with the sling or push at incorrect places on the edge, squeezing or bending the mirror. The astigmatism should change with telescope altitude, and if you point the telescope straight up and give it a "good shake" to make sure the mirror isn't hung up on anything, then the astigmatism should all but disappear.
A properly-positioned cable sling should introduce a small amount of astigmatism in a primary mirror, but not a large amount. If this is not the case, you should make sure the cable is positioned properly at the center of gravity of the mirror, and that the mirror is not bumping into something else due to a slack cable.
If you have astigmatism that actually seems to get better as the telescope is pointed lower, then you may have a mirror cell with triangles or supports that are bound up. I have seen this happen more than once. As I mentioned in the Pinched Optics section above, make sure the mirror is sitting on all of the support points, and that the triangles or pivots can move freely. Either of those will cause major problems with images.
If, after adjusting the cell, rotating the primary, shaking the scope, or even giving the mirror box a good whack with your first, images suddently become good and stars round, you have freed something that was bound up. Pat yourself on the back, gloat to your friends, and have a beverage if you are so inclined. However, don't forget how you fixed the problem, and keep looking at the components of the scope carefully. Eventually you'll figure out what is actually causing the problem.
Don't be surprised if the fix is as easy as bumping some part of the scope to free it up. The moral of the story is this - you don't make stars round accidentally - you make them round by fixing problems.
A pinched secondary mirror can create oddly-shaped non-round stars. This can happen when the shell of the holder pushes on the edge of the secondary because the shell is too small or has the wrong shape, or when there is too much force pushing the secondary into the retaining lip, usually applied by the stuffing behind the secondary mirror. In either case, the situation needs to be remedied.
For more information on recommend construction techniques for primary mirror cells and recommended fitting techniques for secondary holders, refer to my other article - A Modern Guide to Mirror Support.
A bad secondary mirror will often have a curve to its surface, and this can cause astigmatism because it is mounted at a 45-degree angle. The astigmatism should be fairly consistent for all telescope altitudes, and will usually be aligned with the tube. If you can't find any other problems, have the secondary tested, or swap it out and see if the problem goes away.
Additionally, a secondary mirror can be thermally warped into a curved shape by a dew heater that is producing a lot of heat. That heat is applied to the back of the secondary mirror, which cause it to expand, making the shape of the front of the mirror concave, which causes astigmatism. I have personally seen this occur on a large 6" m.a. flat in a 30" telescope. The heat plume coming off of the mirror was conspicuous in the defocused image of a star, and that is how I noticed the problem. After reducing the heat output we watched the astigmatism disappear over about an hour. So, this problem will not go away immediately after turning down the heat, but smaller mirrors should respond more quickly.
Primary mirror strain-induced astigmatism
If the primary mirror is made from poorly annealed glass, it will have strain. Strain is internal stress within the glass, and it is more likely to be found in cheap mirrors made from cheap glass. When exposed to a temperature change, especially a rapid one such as bringing a scope outside into the cold, the mirror may go astigmatic.
The good news is, as the mirror temperature equalizes, the astigmatism should go away. Additionally, the strain should rotate with the primary mirror and stay with its rotation over time as it slowly disappears.
However, if you like to observe shortly after bringing the telescope out, this is not good news. You will be stuck with astigmatic images until the mirror cools sufficiently.
Poorly aligned focuser or corrector
The last cause of astigmatism that I have encountered is a poorly aligned focuser or corrector. This can be a real problem for a faster telescopes (those with lower f/#s) and when coma correctors are used.If all other possible sources of astigmatism have been eliminated, check the squareness of the focuser and make sure that the eyepiece and coma corrector are in the focuser squarely. One time, I experienced a case where the setscrew of a focuser pushed the coma corrector of to one side and caused it to tilt slightly, introducing astigmatism and other aberrations into the images of an f/4 telescope. I fixed the problem by making sure the corrector was pushed all the way into the focuser. As with a laser, make sure the top surface of the focuser and the bottom surface of the corrector are clean so that they can mate together cleanly, snugly, and precisely. Those surfaces control the optical alignment of anything that is in the focuser.
Naturally, after making sure that the coma corrector (hopefully a Paracorr 2 for the faster, modern telescopes!) is properly inserted in the focuser, one should also make sure that all setscrews are tightened snugly. This includes the two thumbscrews at the top of the focuser, the two thumbscrews at the top of the Paracorr that hold the eyepiece/adapter in, and the thumbscrew that locks the tunable top of the Paracorr. In total, this is FIVE thumbscrews, and they are all important. They are of even more importance when heavy and/or tall eyepieces are used, because those eyepieces exert more torque on the Paracorr and focuser, and can more easily become misaligned to the optical axis.
Side note: If you use the Starlight Instruments SIPS, which includes a Paracorr 2 and eliminates the need to tune the Paracorr top, then all you have to do is put the eyepiece in a focuser and tighten its thumbscrews. This unit eliminates the possibility of having the corrector in the focuser slightly askew, and, in my opinion, contributes to the best possible image quality.
As a last resort, try rotating the corrector and/or eyepiece in the focuser (making sure that it is inserted all the way into the barrel) to see if the astigmatism rotates with either of those. If it does, you have found your culprit.
Other thermal effects on optics
Now let's conclude this article by looking at one issue that involves round stars. Purely thermal effects on optics aren't always of a nature that causes stars to be non-round - often they affect the perceived correction of the optic. Many people star test telescopes to help them determine the quality of their optics. However, people often mistake the effect of dropping temperatures on the mirror for optical problems.The lower-cost glasses such as Pyrex, Supremax, plate glass, etc., have coefficients of thermal expansion that are significant given typical range of air temperature over the course of a night in most locations on earth. This means that the mirrors actually shrink or expand as their temperature decreases or increases. Also, it is normal that certain parts of a mirror cool faster than others, so certain parts of the mirror will shrink more quickly than others, and this will temporarily change the optical figure of the mirror until all parts of the mirror come back to the same temperature as the air. Unfortunately this will never happen on most nights, and the amount of difference varies.
The higher-cost glasses and materials such as quartz, Zerodur, Cervit, ULE, etc., have relatively small coefficients of thermal expansion. This means that mirrors made from these materials don't change size or shape very much over a night, making them very desirable for telescope mirrors. Unfortunately quartz is significantly more expensive than the lower-cost glasses, and the others are far more expensive than that. Thus, most people have mirrors made from the lower-cost glasses, so these mirrors change their optical figure as the air around them changes temperature.
 Therefore,
it is completely normal for a well-corrected,
high-quality mirror, made from Pyrex, Supremax, or other lower-cost
glass, to
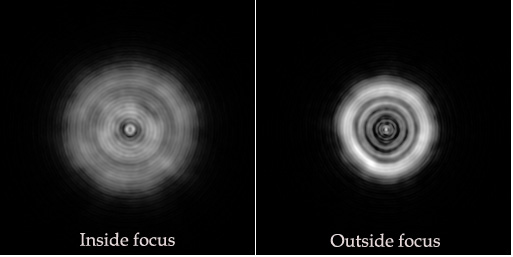
appear overcorrected while it cools. This
condition is
indicated
by obvious rings in the structure of a defocused star on the outside of
focus, and indistinct rings on the inside of focus. As the
mirror
approaches air temperature, this condition gradually goes away.
Therefore,
it is completely normal for a well-corrected,
high-quality mirror, made from Pyrex, Supremax, or other lower-cost
glass, to
appear overcorrected while it cools. This
condition is
indicated
by obvious rings in the structure of a defocused star on the outside of
focus, and indistinct rings on the inside of focus. As the
mirror
approaches air temperature, this condition gradually goes away.The reason for this, as mentioned above, is the mirror doesn't cool evenly - it cools faster near the edge of the mirror and wherever the miror is exposed to the cold sky above (obviously the front of the mirror is exposed to the sky) or to cooling breezes or fans. The cooler areas physically shrink, changing the shape of the mirror, and usually resulting in perceived overcorrection as seen in the star test.
Thus, especially for larger mirrors star testing is climate dependent since larger pieces of glass (generally 16" and up) cannot keep up with the cooling of the air.
I have seen proof of this with my own eyes for years - for the two 32" telescopes that we take to Okie-Tex and the Winter Star Party in the Florida Keys, the star test at WSP is superb after a couple of hours. There night time air temperatures don't fall much. However, the same scopes star test overcorrected all night and sometimes shows a turned edge (which is not there) in the desert environment of Okie-Tex. This is true for both 32"s, so it is not a fluke.
So, not only are we testing the optics, we are also testing how the glass changes shape as it cools. I figured the 32" mirrors to be very, very close to parabolic, they are not purposely undercorrected. So, I know that if I see a good star test for a large telescope in a location where the air temperatures are falling quickly, then that mirror is very likely undercorrected by a significant amount, or it is made from a more expensive material (quartz, Zerodur, etc).
For a numerical example, let's say the outer part of a 2"-thick mirror is one degree Celcius (1.8 deg F) cooler than the rest of the mirror. The coefficient of thermal expansion of Pyrex/Supremax (borosilicate glass) is 3.25*10^-6 per degree C. If we assume that the front of the mirror shrinks downward toward the center of the mirror and the back of the mirror shrinks upward toward the center of the mirror, then this means that we're interested in the dimensional change of a 1" thick piece of glass (the 1"-thick layer of the primary that lies between its center and the optical surface).
So, a one degree lower temperature in the outer part of the mirror means that the 1" of glass underneath the optical surface shrinks downward by 3.25 millionths of an inch, or about 1/7-wave on the glass, 2/7-wave on the wavefront. This pulls down the outer part of the mirror, effectively overcorrecting it. The effect is visible in a star test and looks like overcorrection. It will affect images a bit.
A temperature difference of two degrees C, or 3.6 degrees F, results in shrinking by 2/7 wave on the glass, or 4/7 wave on the wavefront. This should be very easily visible in the star test, and the effect on images will be significant too. I have measured this much distortion in a 28" mirror that was tested in my shop while it was cooling strongly, so I know that it is possible. (See my article Four Lessons in Mirror Testing to see those measurements.)
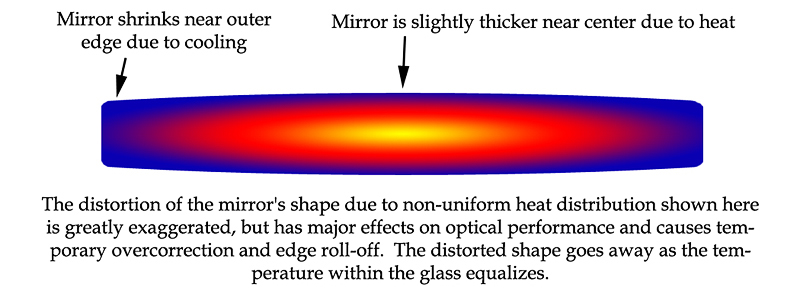
To help you understand what is going on, I made the image below. It shows how the mirror changes shape due to internal temperature imbalance, the type that is typically produced by cooling outdoor temperatures.
For many decades it has been a common practice by some to leave mirrors made from Pyrex, Supremax, and higher expansion glasses undercorrected to help compensate for this, but that results in an inaccurate mirror when the mirror temperature gets close to equilibrium. These mirrors are then undercorrected except when very specific observing conditions are experienced, and will only perform optimally when cooling conditions exactly match the amount of undercorrection that is figured in, which will be quite a rare occurrence, and at that time the cooling itself will degrade the performance anyway because convective heating will cause air currents. Doing this is quite unwise in my experience.
The implication of the information above is that star testing a large mirror is not simple, and often it gives you an erroneous impression of the quality of the mirror because accurately corrected mirrors appear overcorrected while cooling. Therefore, star testing must be done over many nights and in a variety of conditions in order to even get close to estimating the true shape of the mirror. Even then, it is my experience that a test done in a lab environment with everything in thermal equilibrium is by far the best way to evaluate a telescope mirror.
It has been suggested by others in the past that insulating the edge of the mirror could reduce temperature imbalance within the glass, and may help reduce the temperature-induced overcorrection. With the lower-quality "light bucket" optics of the past, the effect of insulating the edge may not have been noticeable or significant. However, now that we are in a modern era that features more high-quality, large, fast mirrors, it may be time to try this again. I have not heard of anyone trying it recently, and I have not tried it myself since my 20" f/3.0 mirror is only 1.25" thick, and the thermal effects are not as significant.
This brings the subject of mirror thickness into the discussion. Thinner mirrors can be more difficult to make, and can require more time and labor, thus making them more expensive. However, this leads to faster cooling and better performance all through the night, and also makes the telescope lighter. My recommendation for the fastest-cooling mirror (the thinnest mirror, of course) that doesn't add significantly to the cost of the mirror. For this, the ratio of mirror diameter to thickness is approximately 12:1 to 15:1.
I often use blanks that are 1.25" thick for 16" mirrors, 1.35" thick for 18"s, 1.4" thick for 20"s, 1.5" thick for 22"s, 1.6" thick for 24"s, and 2.0" thick for 28"s, 30"s, and sometimes 32"s. However, this should make it quite obvious that those who claim that 2.0" thick mirrors are always better are simply saying that for marketing reasons, and it has no basis in fact. The facts are that thinner mirrors, when made properly and supported properly, will outperform thicker mirrors because the thinner mirrors cool faster. This principle applies to any type of glass.
So, thinner mirrors are better if you can support them properly, and quartz isrecommended if it is available you can afford the extra expense. Much higher-priced near-zero expansion materials like Zerodur, ULE, etc., in my opinion are overkill for most amateur applications.
Getting back to thermal effects, metal shrinks more than glass, so in some cases, a shrinking mirror cell can actually pull very slightly on a mirror, particularly if the support pads have even a slight tendency to "stick" to the glass. This may also contribute to a perceived overcorrection. Giving the mirror a "shake", as described above, may help in some situations.
Finally, a client brought another thermal effect to my attention recently. He noted that his secondary heater affected the star test of a mirror that he had. This makes sense, because the secondary heater may only heat the central part of the back of the secondary mirror, and this can cause a variety of possible effects on the wavefront. He noted that the secondary shadow "breakout" position varied quite a bit on one side of focus versus the other. This judging of the "breakout", or where the secondary shadow becomes visible, is a popular way to help estimate the correction of a primary mirror through star testing. However, this observation can be made quite erroneous due to the thermal condition of the primary OR secondary mirror, or BOTH.
Finally, one last note on correction issues that is not related to the cooling of the mirror - check you Paracorr setting. I have seen an improperly tuned Paracorr cause significant spherical aberration in a star test on more than one occasion. This happens when the eyepiece is changed and then tunable top is not tuned properly, or when the proper 1.25" adapter is not used with certain eyepieces. For reference, you can refer to the Paracorr Type 2 Instructions.
Bottom line - be careful with claims that you make based on star testing. They might be quite wrong.
Conclusion
This article has been many years in the making. I've experienced all kinds of telescope problems including most of the conditions that I've described above. I've been filing them away in my memory, and it was finally time to put them into an article. I've also refined my collimation technique that I describe above so that I can always be assured of having good collimation that lets very fast mirrors perform at their best, and just as well as slower instruments.So, the problems mentioned above can be very real, as are the solutions. As an optician, it is also in my best interest to educate people on what can hurt or help the performance of telescope optics. Quite honestly, educating telescope owners reduces the number of issues that I am blamed for, and allows their owners to fix them and enjoy the full potential of their often very expensive instruments.
I hope this article has helped you understand a bit more the behavior of telescope optics under realistic conditions. I also hope that it has allowed you to improve your telescope's collimation, and has given you the skills to troubleshoot common problems with telescope optics. If it has, please ask your friends to read it, and teach them what you have learned.
Next, I recommend that you read my article "Four lessons in mirror testing" for more information about a telescope that went through part of this process, and more about related thermal and optical isues.
I wish you clear, dark skies, and round, tiny stars.
-Mike
Lockwood, Lockwood Custom Optics