Lockwood Custom OpticsAdventures in Nightvision - Part 1
|
Introduction, disclaimer, etc. Consider this my nightvision blog where I can post photos and other things that don't have a place elsewhere. Typos, imperfect grammar, strong opinions, and bad language may be present, but I don't care. Proceed at your own risk! Recently nightvision was given its own forum on Cloudy Nights, and you can see it here: Nightvision Astronomy Forum, Cloudy Nights This article is a bit of a patchwork of observing reports, information, and entries that seek to fill in the blanks on various small topics within the large subject of nightvision. Nightvision monoculars (and sometimes binoculars) are devices that amplify light from the visible and shorter infrared (deep red) ranges of the spectrum and deliver an image to a phosphor screen. This screen is like a miniature TV tube, and an eyepiece on the nightvision (NV) monocular allows viewing of this screen. It is like looking through an eyepiece that makes many things brighter, and in their native format, they have a power of 1X. When you put two together, you have one unit for each eye, and you get a few that is very comfortable, without too much distortion. You can easily walk around while looking through them, and this is what you typically see used by specialized military units for night operations. Most of the modern units are ITAR controlled, meaning they can't be exported without a license. In other words, if you own one, don't take it out of the country, even by accident, or you can end up in a lot of legal trouble. These units are available in foreign countries, and should generally only be taken to countries that have similar rules. A unit bought in Europe should not be brought to the US, and vice versa. However, they are available in most advanced countries. Modern units have adjustable gain, so that the brightness of the image can be controlled. This is very useful, and I recommend this type of NV unit. A common type of unit is called a PVS-14. These come with a 1X lens. An optional 3X lens can be screwed to the front of the 1X lens for more magnification, and I recommend this if you buy one made by the same manufacturer as the NV unit. The best modern units cost about $4,000 US for what is typically available. Accessories are additional. The highest spec units are available for a premium on top of that, and usually require waiting a while for one to become available. Older technology is available for less money. Those with experience can build their own units after buying a tube and a housing. There are two ways that the NV units are generally used. These modes are discussed more in the July 29 entry below. First, one simply takes the unit with the stock 1X lens on the front (most common type is called a PVS-14) and looks into a telescope eyepiece with it. This is called afocal use. Special adapters are available to allow the NV unit to be attached to TeleVue eyepieces, and others can be made to adapt to other eyepieces. The NV unit 1X lens has about a 40 degree field of view, so it can only see the center of the eyepiece field. Thus, eyepieces with distortion at the edges of the field may work just fine. Many entries below shows afocal use and many images that resulted. Eyepieces should have at least 20mm of eye relief (the exit pupil is at least 20mm above the physical top of the eyepiece) so that the 1X lens can take in all of the light from the eyepiece. The second mode of usage is prime focus. The telescope forms its image at the focal plane, and the NV unit is positioned so that the focal plane falls on the photocathode of the NV unit, which is its sensor. Then the light is amplified. The advantage of this method is simplicity, and some losses from glass transmission are eliminated. However, one is stuck with the magnification that a 26mm eyepiece would provide. If one has many telescopes that can be set up, then this can be quite enjoyable. The other advantage is that smaller machine vision and camera lenses can be used in place of a telescope. I use my NV monocular, a TNV-14, which is a PVS-14 from Tactical NightVision Company (TNVC), in afocal mode. The 1X lens is not removeable, and I have a 3X attachment. I use a homemade filter holder (see Feb. 7 entry below), the TeleVue/TNVC eyepiece adapter (machined out to ~22mm central aperture, see April 20 entry below), and a TeleVue 55mm Plossl (now adapted to 67mm with their additional lens), 41mm Panoptic, 27mm Panoptic, and 17.3mm Delos. For very bright objects, shorter focal length Delos eyepieces are sometimes used. I use the following filters currently, all in 2" diameter: 610nm Baader longpass, Celestron UHC/LPR, 7nm Baader H-alpha, 3.5nm Antlia H-alpha I use a homemade bracket to hold a Canon G15 to take images through the TNV-14 eyepiece, see the Feb. 2020 entry below for details. October 12, 2017 On the night of October 12th, I did afocal eyepiece testing. Here are the eyepieces and nightvision unit that I used. 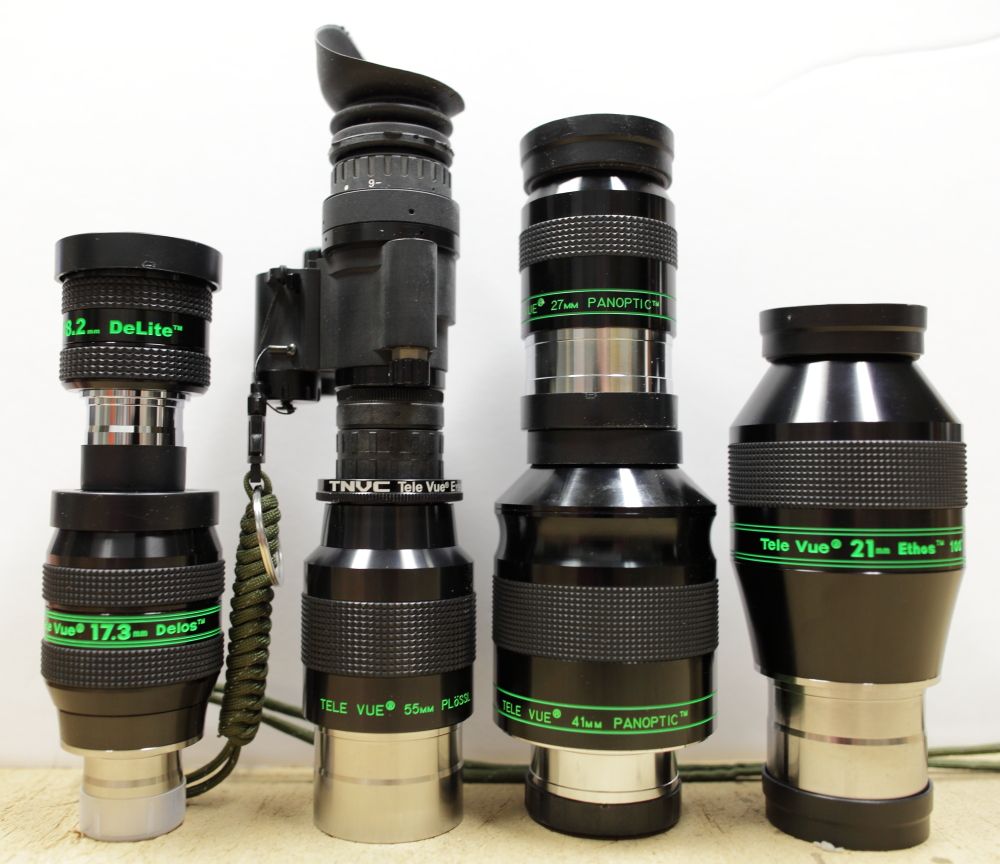 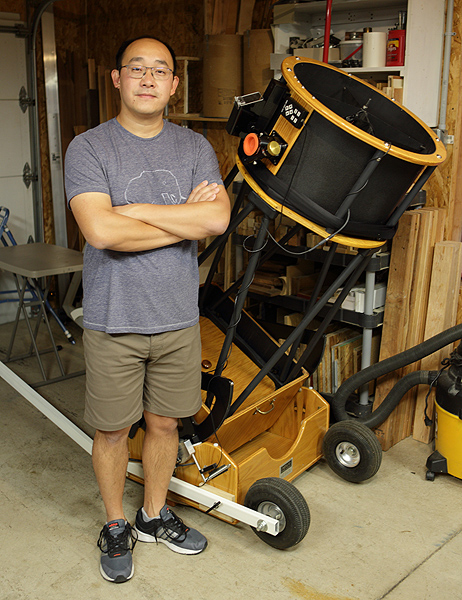 Testing was done in
my driveway on a night that was clear, but fairly humid.
Transparency was about a 6 out of 10, and Milky Way
was visible, but not nearly as distinct as it would be at its best.
The temperature was about 55° to 60° F, and
there was almost no wind at
observing time. I used my 20" f/3.0 (see articles here and here) for this observing session.
It uses a Starlight Integrated Paracorr System (SIPS),
so including the 15% Barlow effect of the Paracorr, effectively it was
operating as a 20" f/3.45. The SIPS was always in place, even
when doing prime-focus viewing for comparison. For me, the
Paracorr/SIPS is a necessity, even with nightvision, because the coma
(especially when added to eyepiece aberrations) is quite objectionable
to me. Testing was done in
my driveway on a night that was clear, but fairly humid.
Transparency was about a 6 out of 10, and Milky Way
was visible, but not nearly as distinct as it would be at its best.
The temperature was about 55° to 60° F, and
there was almost no wind at
observing time. I used my 20" f/3.0 (see articles here and here) for this observing session.
It uses a Starlight Integrated Paracorr System (SIPS),
so including the 15% Barlow effect of the Paracorr, effectively it was
operating as a 20" f/3.45. The SIPS was always in place, even
when doing prime-focus viewing for comparison. For me, the
Paracorr/SIPS is a necessity, even with nightvision, because the coma
(especially when added to eyepiece aberrations) is quite objectionable
to me.Before anyone asks - yes you can use a 55mm, 41mm, or 31mm eyepiece with this nightvision unit and get all of the light into the nightvision unit. Even though humans only have a ~7mm pupil in their eyes, the nightvision unit has a ~21mm diameter objective on the front that is used for afocal observing, and this objective can receive the huge exit pupil from the 55mm eyepiece when used with my 20" f/3.0 (operating at f/3.45), and even when used in my 14.5" f/2.55 operating at f/2.93 with the Paracorr 2! This is a huge advantage, and allows wide fields of view and greater density of photons per unit area falling on the photocathode of the nightvision unit, thus increasing the brightness of images just as a fast telescope/lens does on extended objects with film or a CCD sensor. So, faster = brighter, and exit pupil limitations are essentially gone. The photo at right shows Peter Wang with the 20" f/3.0 when he came to visit in August to do some observing with the 20". He has a very nice introduction to nightvision on his web site. We had a total of about one and a half clear nights over the course of a long weekend, and very high humidity. I actually had to use a fan/electric heater to heat the primary after it instantly dewed up after I rolled the telescope out of the garage! This worked, and we were able to observe through a good part of the night. To compare eyepieces, I used a Mod3 filmless white phosphor nightvision device, loaned by Peter. I had also used it in a variety of telescopes (from a 24" f/2.75 to a 32" f/3.6) at the Okie-Tex Star Party about a month prior to this. I set the manual gain at a pleasant viewing level and did not change it throughout all testing in this session. The Tactical Night Vision Company (TNVC)/Televue afocal astronomy adapter was used to connect the Mod3 intensifier to a variety of TeleVue eyepieces. I used a Canon G15 to capture images. It 's a point-and-shoot camera that can shoot in RAW format with reasonably low noise and a fairly fast lens. The end of its pop-out lens is flat, as is the surface of the nightvision eyepiece with the rubber eyecup removed, so I could put the two surfaces together and hand-hold the camera to get decent images of up to a 1.0-second in exposure, which is the maximum that camera will do. If the camera slipped noticeably during the exposure, I just took another one, but sometimes that was hard to notice. Thus, the images are not all of the same quality, and conclusions should not be drawn about sizes and shapes of stars. We are only interested in brightness here. I used the camera in manual mode and kept settings constant for the eyepiece comparison and a prime-focus image. I had to zoom in the same amount each time I turned on the camera to increase the size of the image seen by the camera and fill the frame, and I did this as accurately as I could based on the display of the zoom setting. It was not perfect, but I got fairly close. I tracked M17, which was rather low in the sky. Images at the beginning and end of the session showed that there was no significant change of brightness due to atmospheric extinction, so that was not a factor in the testing. Photos in the mosaic below were taken of M17 with NO filter. They show the expected loss in brightness as the image is magnified. However, when the intensifier is used visually, this difference is less, because the eye adapts to the brightess of the output of the intensifier. In particular the darker views above looked a bit better visually. 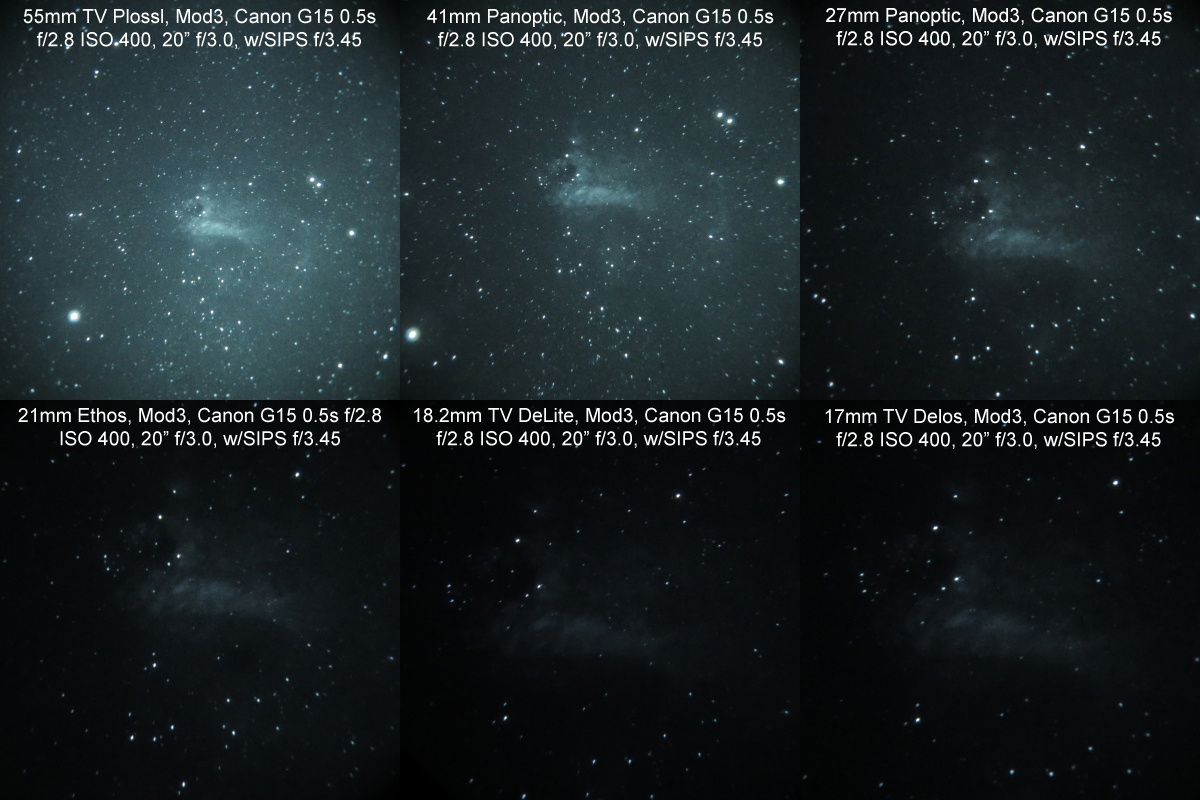 For comparison, below is a mosaic of the view in prime focus mode (left) and then afocally with two different 2" filters used on the 55mm Plossl. The prime focus image was taken at the same camera settings as the eyepiece comparison mosaic above to facilitate comparisons. The center and right image were taken with different camera settings. Refer to the text on the images for exposure information. 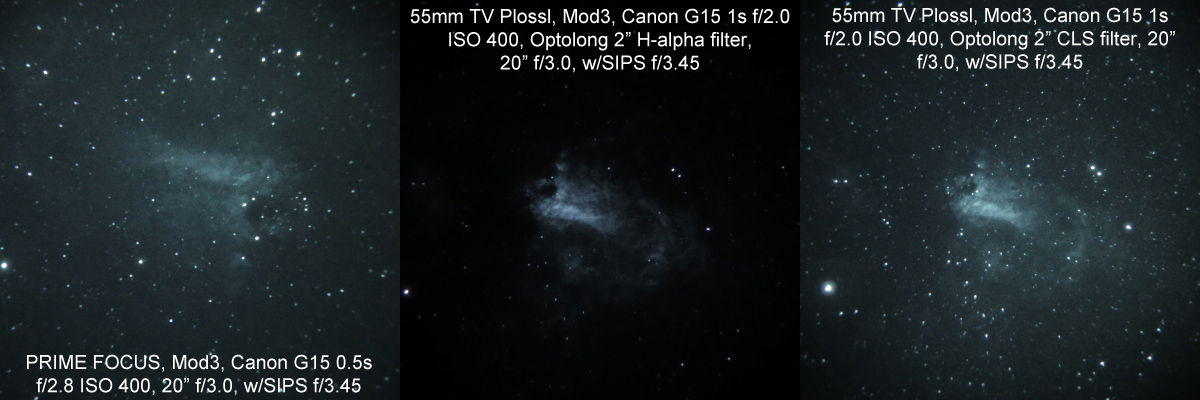 It is clear that the prime focus image fits nicely into the sequence of images, in terms of brightness, and is close to the view of the 27mm Panoptic. The view with the 55mm Plossl and 41mm Panoptic are brighter, though, proving that prime-focus is not the best possible view in terms of field of view and brightness of objects. Visually, in my 20" f/3.0 (operating at f/3.45) the 55mm Plossl does distort star images as one looks off-axis, but it doesn't seriously hinder this type of observing, and the wide field is quite worth it, in my opinion. To achieve focus with the SIPS, the 55mm must be pulled out of the focuser a bit, so I may make or acquire a spacer to limit how far it goes into the focuser. Additionally, I should mention that doing prime-focus with my SIPS-equipped telescope was a royal pain in the ass. I had to remove the lens from the NV unit, install a 2" adapter, and then spin the threaded focuser/SIPS assembly inward about 8 turns in order to simply achieve focus. I also had to take off the Telrad in order to allow the focuser and SIPS assembly to be rotated. This is annoying and time consuming to do and undo, and I found the view in the 55mm and 41mm eyepieces completely removed my motivation to use prime-focus. Be aware that many telescopes will not have enough in-travel to achieve focus. The two images at center and right above were taken with borrowed 2" imaging filters, an Optolong 2" H-alpha filter (7nm BW) and an Optolong 2" CLS light pollution filter intended for imaging. The latter has two passband regions, one from ~450-525 nm that will not be seen with this particular intensifier, and a region at 625nm and longer which will be seen. The results of this testing? No major surprises, and finally a definitive set of images showing a comparison between various TeleVue eyepieces used afocally and prime focus with the NV device. The H-alpha filter dramatically improves contrast, but requires more gain. The LP filter improves contrast a bit and also requires a bit more gain. More testing may be done with it later on. Note: The the prime-focus image is inverted compared to the afocal images. In the prime focus arrangement, the nightvision objective lens is removed. The nightvision tube itself inverts the image with an internal fiber optic "twist", so prime focus images are an inverted image of the focal plane. For afocal, we use an eyepiece and the nightvision lens. An eyepiece only images the focal plane and does not reverse it. The nightvision unit produces images that are non-reversed from what it sees (otherwise walking around with the 1X version would be impossible!), so the whole chain of eyepiece, nightvision objective lens, and fiber optic "twist" produces a non-inverted image of the focal plane. I hope to do a comparison with my 14.5" f/2.55 in a future session, depending on weather conditions. A drier night should be better. I'll probably use the objects in Cygnus like the Crescent Nebula, North American Nebula, etc. |
October 16, 2017 It was a fairly transparent night, and I managed to get both the 14.5" f/2.55 and 20" f/3.0 set up, collimated, and ready to go before darkness fell. I had dinner and poured a beer and headed out for some comparison observing and crude photography of various objects. The goal was to show approximately what one would see with their eye if they were observing with me. I also did a comparison of the two telescopes. I used the 55mm TeleVue Plossl afocally with the TNVC/Televue adapter, and the same Mod3 on loan as the last installment. I took photos of the same object, M17, to start with, then some other objects. Below are afocal images taken with the 20" f/3.0 and 14.5" f/2.55. No filter was used. All images were taken hand-held against the NV unit top with a Canon G15, 1s exposure, f/2.0, ISO400. The first three sets of images were taken with no filter, all after were taken using a 2" Optolong 7nm BW H-alpha filter. The 14.5" f/2.55 uses a tunable-top Paracorr 2, the 20" f/3.0 has a Starlight SIPS built-in Paracorr 2. Please keep in mind that the camera was hand held for images, and are not the highest quality. In particular the images taken through the 14.5" f/2.55 vary in quality around the field, and this is due to camera alignment and other issues. Please don't blame this on the eyepiece, there are other issues at work! Images from the 14" f/2.55 (operating at f/2.93) are on the left below, images from the 20" f/3.0 (operating at f/3.45) are on the right. Here is M17 (no filter):   M11 (no filter):   M27 (no filter): 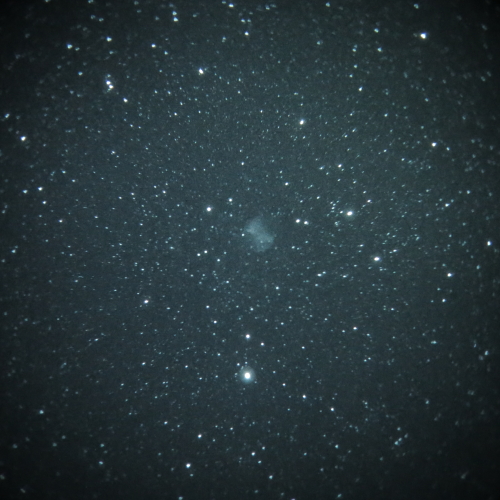 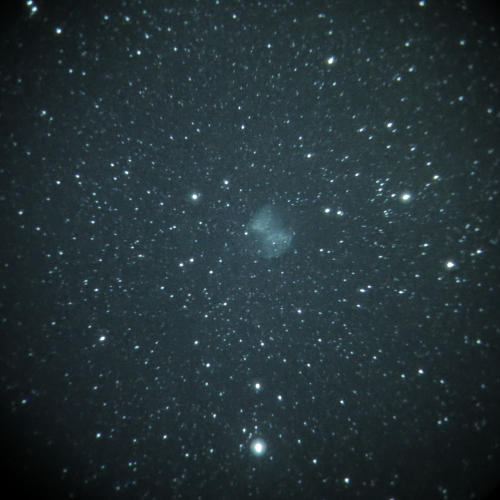 After this it was time to install the Optolong 2" H-alpha filter (7nm BW) and see what both scopes could do. The night was better than October 12 in terms of transparency, but it wasn't ideal. I chose objects higher in the sky at first, and then I went hunting for objects that showed well in H-alpha. It turned into an H-alpha binge observing and crude imaging session. M27 (H-alpha) 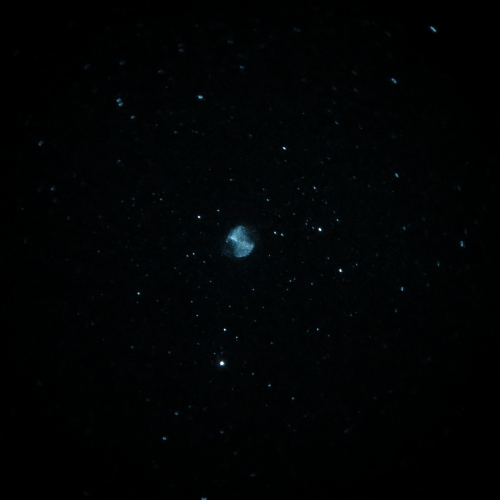 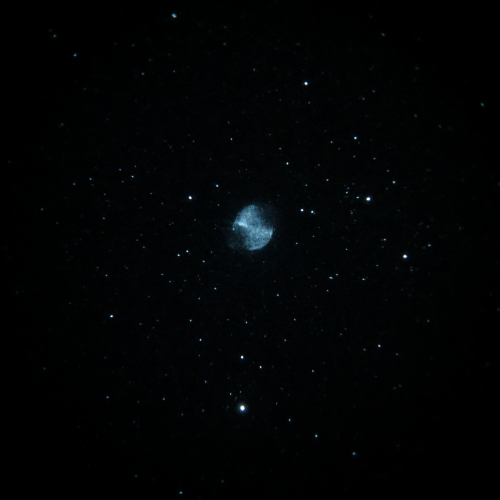 Portions of the North American/Pelican Nebula complex: 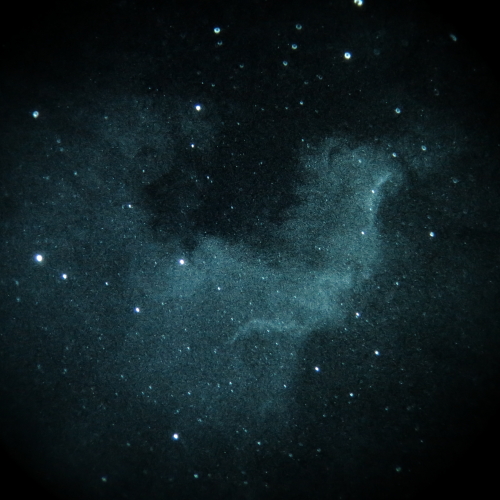 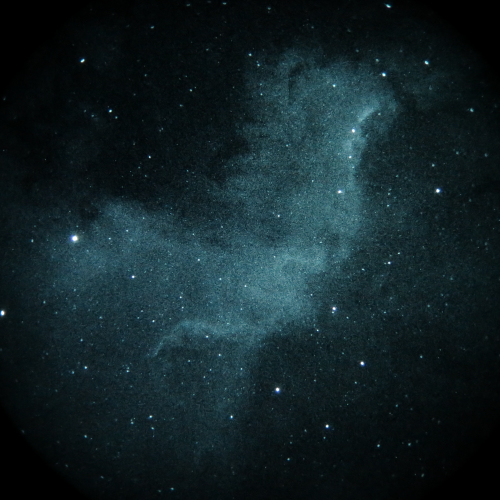 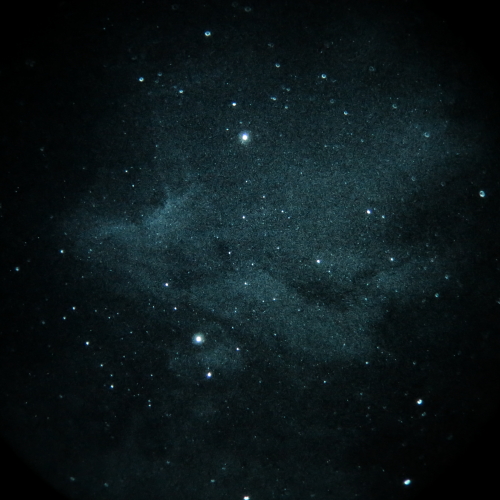 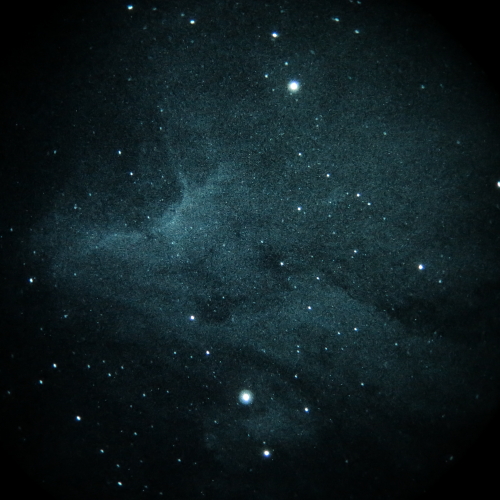 Portions of the Gamma Cygni region: 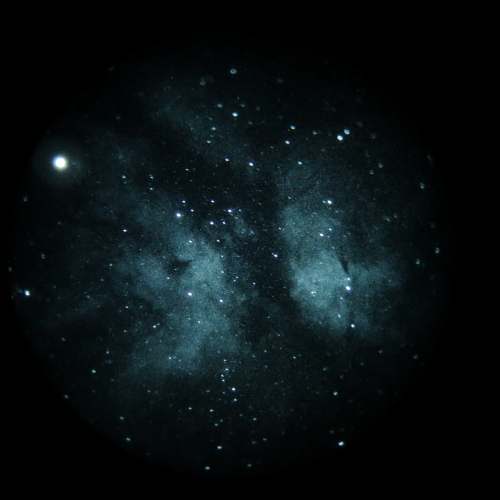 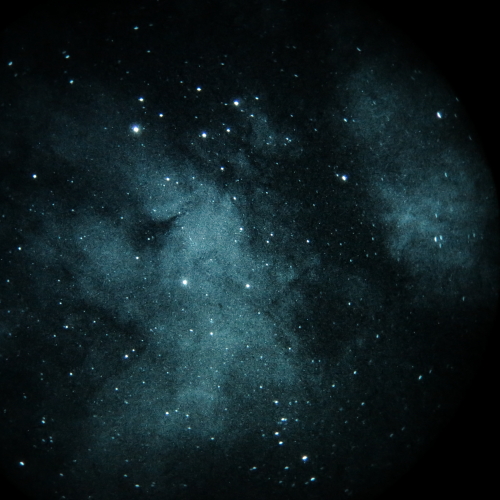 The Crescent Nebula (NGC 6888): 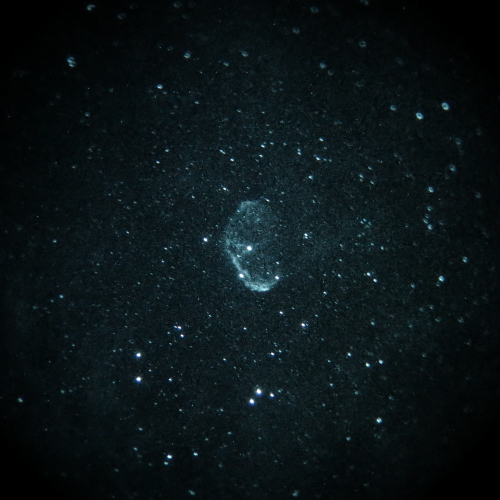 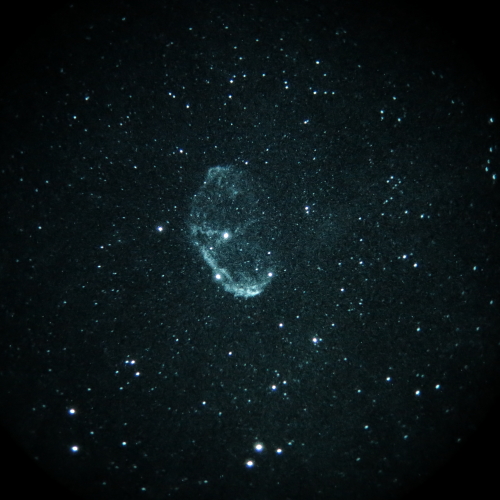 The "interesting" part of the Veil Nebula, NGC 6992, 6995, and IC1340: 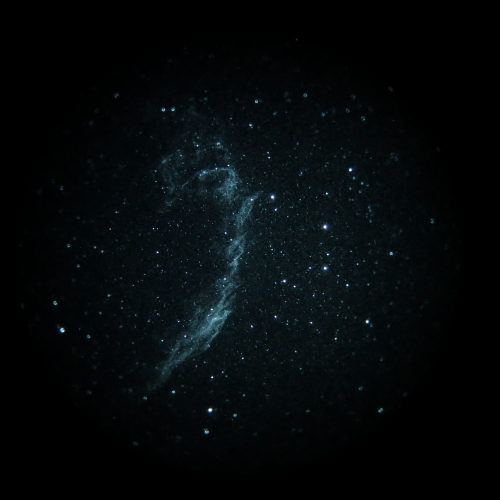 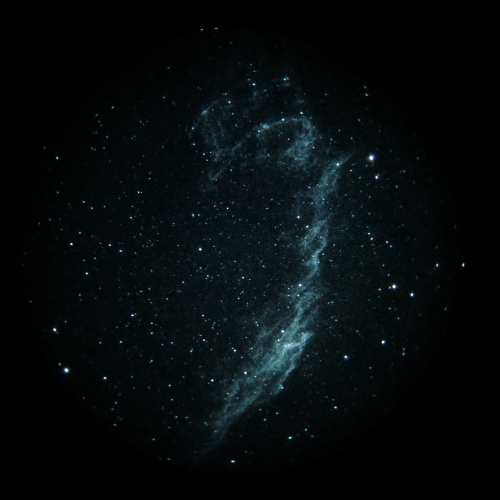 Pacman Nebula, NGC281, Cassiopeia: 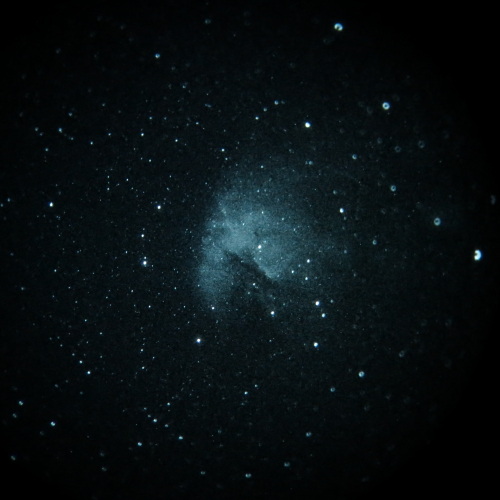 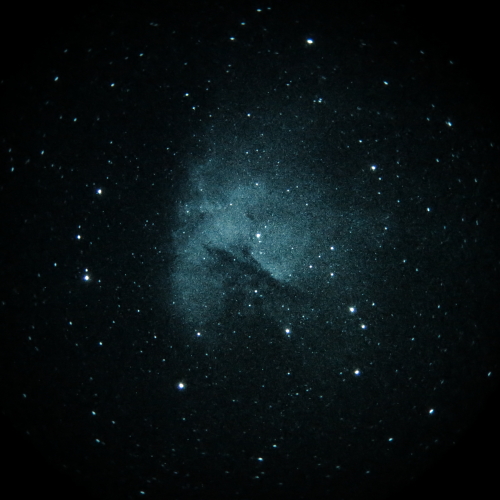 Part of the California Nebula   Overall I was very impressed with what I could see with these relatively large telescopes. I am not aware of others using 2" h-alpha filters yet, but I think this will be come quite common for nightvision observing in the future. I have made some inquiries to see if I can get some other loaner filters - these can have blemishes for our purposes, so I am hoping to be able to get some of these and compare many filters in the future and see what works best. I also have a few other tricks up my sleeve...... October 18, 2017 On this night I had invited the friend who had loaned me the Optolong H-alpha and CLS filters over to see what his filters did when mated to an eyepiece and nightvision unit in afocal arrangement in my 20" f/3.0 (again, operating with a TeleVue/Starlight SIPS at f/3.45 with Paracorr 15% barlow factor). Before he arrived, I had time to shoot a series of eyepiece comparison shots without allowing my Canon G15 to turn off, and thus preserving the zoom setting. (When the camera is turned off, the lens retracts and the zoom goes back to default wide-angle.) I turned up the NV gain all the way and left it, just to make sure I didn't accidentally change it while changing eyepieces. Please NOTE: These images were taking at a different gain setting than my previous eyepiece comparison, which was at some gain setting that I can't replicate because there is no way to tell exactly where the gain is set. Also, the seeing was much worse on this night than on Oct. 12, so stars are larger. The wind was blowing and it was difficult to get good images with the shorter focal length eyepieces. Unfortunately I did not have time to go to prime-focus operation, because my friend arrived as I was finishing, and because the camera would have shut off at some point during the 5-10 minutes it takes to do the change-over. The next comparison will have to wait until some appropriate objects is higher in the sky - M17 is just getting too low at this time. Anyway, here is a mosaic images taken with six eyepieces, all without changing anything at all on the camera, including zoom.  I think that shows the difference in brightness quite well. Sorry I couldn't do prime focus, but I'll do that another time on a different objects. October 25, 2017 I did some quick testing with 2" narrowband filters placed in a holder, which was the end the cut-off portion of a focuser extension tube that I cannibalized for several parts. This allowed me to hand-hold the filter in front of a nightvision unit and tilt it manually. I looked at the H-alpha regions in Cygnus, as well as a few others, and with the object centered, it showed up nicely. Moving the object to the edge of the field of view caused it to disappear. However, tilting the filter in that direction brought it back. This is conclusive proof that the flat filters cause band-shift in off-axis portions of the image because the light from off-axis regions travels through the filter at an angle that departs from normal incidence (going straight through the filter) by a significant amount. The 40° field of a nightvision unit means that light at the edge of the field is coming in at an angle that is 20° from normal incidence. For this angle, the filter allows wavelengths different than H-alpha to pass through, which means H-alpha is blocked, and the object disappears. So, for afocal viewing, the best place to put a narrowband filter is not in front of the NV unit, it is on the bottom of the eyepiece, the bottom of the Paracorr, or on a filter slide that sits below the Paracorr or eyepiece. The cone of light from the primary mirror or objective lens covers less angle than the cone entering the nightvision unit. November 5, 2017 So a question has come up about when to use a narrowband filter on an eyepiece (used for afocal imaging) versus over the nightvision device (NVD) objective lens. To minimize de-tuning, or the filter passband shifting, we want light to pass through the filter at close to normal incidence. This is accomplished with a slower converging light cone, also known as a longer or higher f#. So, we need to compare the effective f# that the NVD lens is working at to the f# of the telescope. If the effective f# of the NVD lens is larger than that of the telescope, then the light cone is converging more slowly and putting the filter in front of the NVD objective will work just as well, if it can be done easily. The math is pretty simple, so let's define a few things..... Exit Pupil from the eyepiece (EP) = focal length of eyepiece (FLE) / Telescope f# (TF#), so in variables we have: EP = FLE / Tf# The f# that the NVD is operating at is easily calculated. A telescope's f# = focal length / primary diameter, and thus the f# that the NVD lens is working at is the focal length of the NVD objective (which is 26mm) divided by the effective diameter of the exit pupil, so: NVDf# = 26 / EP Now we just substitute in for EP in the second equation: NVDf# = 26 / (FLE / Tf#), rearranged to: NVDf# = 26 / FLE * Tf# We want to know what focal length of eyepiece (FLE) will cause the nightvision device objective to operate at a higher f# than the telescope itself. So, we just rearrange the equation to get both f#s on the same side -> NVDf# / TF# = 26 / FLE So, by inspection we can see that in order to have the telescope f# (TF#) be larger than the NVD f#, the eyepiece focal length (FLE) must be larger than 26mm so that the ratio on both sides of the equation is less than 1.00. So, whenever the eyepiece focal length is longer than 26mm, the exit pupil is large enough to make the NVD lens operate at a faster/smaller f# than the telescope, and it makes sense to put the filter on the eyepiece instead of the NVD. With the TNVC/TeleVue afocal adapter, it is not really possible to put the filter on the NVD, so I put it on the eyepiece. Since long focal length eyepieces of reasonable quality need to have a large field stop in order to show a wide field of view, they need to be 2" in physical diameter to allow enough of the focal plane to be seen to have a reasonably wide field. Let's pick some established, good quality eyepieces that will work reasonably well in fast telescopes, such as the TeleVue 55mm Plossl or TeleVue 41mm Panoptic. The best way (but not an inexpensive way) to use such eyepieces is to obtain a good quality 2" narrowband filter and simply screw it into the eyepiece barrel, the bottom of a Paracorr, or put the filter in a filter slide below the Paracorr. For a very nice diagram and some other discussion, see TeleVue's new page here: http://www.televue.com/engine/TV3b_page.asp?id=36&Tab=_work With relatively slow telescopes, it won't matter where you put a filter unless you are using very long focal length eyepiece. Let's assume that the 55mm Plossl is going to be the longest focal length eyepiece of reasonable quality that is readiy available. So let's figure out, for the 55mm Plossl, at what f/# you might be concerned about de-tuning effects when using a NVD afocally and having a filter in front of the NVD. This is pretty simple - we just plug our numbers into the third equation above. I have used filters in the barrel of a 55mm Plossl in my f/2.55 telescope and it works quite well with 6nm narrowband filters. The telescope uses a Paracorr, so the true f# going through the filter is 2.55 * 1.15 = 2.93, and let's round to 2.9. Let's find the telescope f# that produces an f/2.9 light cone entering the NVD. We have: 2.9 = 26 / 55 * TF#, so TF# = 6.13 So, with a telescope faster than f/6.13, it is possible to get a light cone of f/2.9 or faster entering the NVD objective, and when using the 55mm Plossl it could be better to put the filter on the bottom of an eyepiece instead of in front of the objective. For me, given the complications of using a smaller filter in front of the NVD, I'll just bite the bullet and use a 2" narrowband filter in the barrel of a long focal length eyepiece (until I get a filter slide) and enjoy afocal observing. February 7, 2018 Without a 1.25" filter or the very thin, difficult to obtain adapter to mount one to a NVD, I decided to make an adapter to use a 2" filter. I had already used these filters by hand holding them in front of the NVD, allowing them to be tilted to verify that band shifting was causing the falloff in nebula brightness at the edge of the field. I had a sacrificial 2" extension tube that I had used part of to make a parfocalizing ring for the 55mm Plossl, and the lower portion, complete with 2" filter threads, was still available. I had used it as the filter holder in the band shifting experiment above so I had a better grip on the expensive 2" filters that I wanted to hold in front of the NVD. So, I needed to adapt the metal piece with filter threads to fit the NVD. I have quite a bit of delrin, so I found some round stock that (by luck) had an outside diameter that fit the inside of the 2" extension tube fairly well. I cut a piece off, turned the ends true in my small lathe, and then machined the inside diameter to fit over the objective lens of the NVD. I got a nice slip-fit, and I left a lip on the plastic on the inside bore so that it could only go on so far. All that I had to do to the metal extension tube was machined a notch to allow clearance for the battery cover of the NVD. This was done with a 3/4" bit in my mill, and can be seen in the image at lower right. To make the plastic fit snugly inside the metal, I simply added a couple of layers of scotch tape. I drilled and tapped for and installed a 4-40 machine screw to hold the two together, as can be seen in the lower left image. Finally, with the two assembled together, I drilled and tapped a hole for a 10-32 nylon thumbscrew to further secure the holder to the NVD.  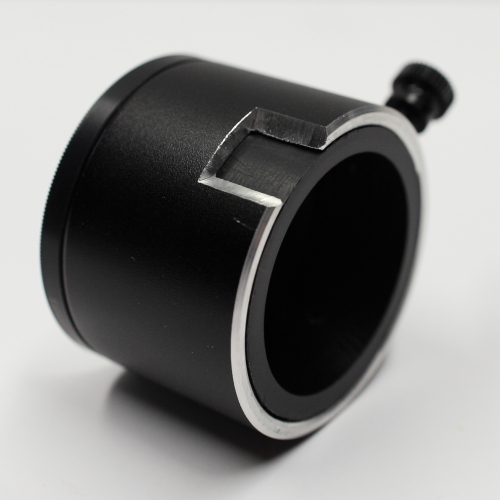 The filter, adapter, thumbscrew, and the machined notch are visible in the image below. It fits very securely, and I am pleased with how it turned out. One final benefit is that I can simply put a 2" eyepiece cap over the adapter after removing the filter, so I don't have to keep track of the very unique dust cap that goes on the NVD, I can just leave it in the bag with other unused NVD items. 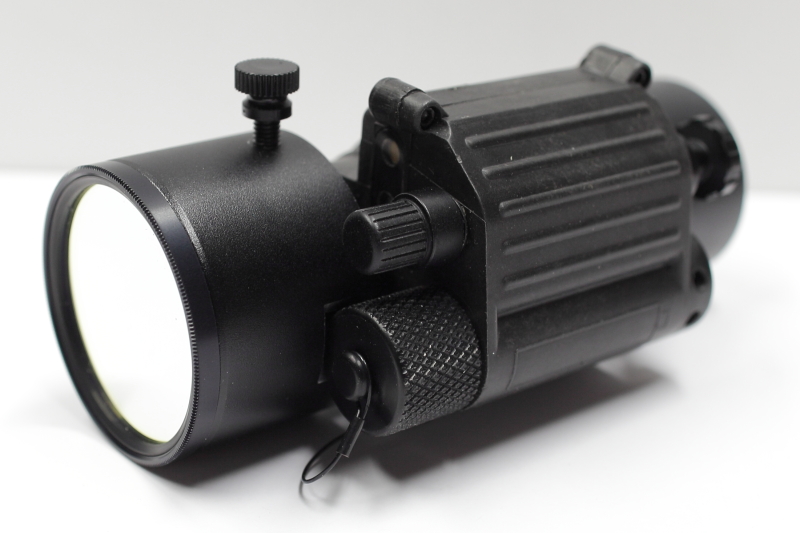 I hope to try out a 2" Baader "Highspeed" filter at some point, I wonder if anyone has tried one? July 2019 - PVS-14 versus Mod3/3c There is a continual debate between the PVS-14 and Mod3/3c form factors for astronomical use. On the Cloudy Nights EAA forum, it is difficult to discuss using a PVS-14 afocally use without someone trying to steer the conversation to prime-focus use of a Mod3/3c. While I encourage people to explore all options, the PVS-14 option usually gets drowned out by vocal Mod3 users. So I'll write my own little entry here. I will explain the difference here, why I chose a PVS-14 at this time, and why I recommend it for my optical clients who already have large, fast Newtonian telescopes, a Paracorr 2 or SIPS coma corrector, and usually some TeleVue eyepieces. Mod3/3c
A Mod3/3c is used at prime focus, i.e. you have no lens on the front of the NV unit and it is used like an eyepiece. The focal plane falls directly on the photocathode through a protective window. This is like a camera, with the image falling on the sensor. In this case, you usually need more focuser in-travel to achieve focus, like you would for imaging, and that can be a problem for Newts unless they have been built with imaging in mind. The Mod3 then acts like a 26mm eyepiece due to how its ocular images the phosphor screen. To change magnification, you need to use a barlow or focal reducer. A focal reducer may not be an option for already fast systems. You can also change the telescope or lens, of course. To add a narrowband filter to a Mod3 used as an eyepiece, you need a 1.25" filter that may require an adapter to screw on to the front of the NV unit. You might also be able to find a 2" adapter with filter threads for the NV unit. This can make getting to focus even trickier, and often part of the NV unit itself hits the top of the focuser and prevents it from going into the focuser fully. The Mod3 can be used with fast camera lenses and other lenses with an adapter for whatever brand of camera that you have, or a C-mount for industrial lenses. You can find lenses similar to the 1X front lens and may be able to adapt to an eyepiece for afocal use if you can find the right adapters and spacing. You may have to buy it yourself, though, if the NV dealer doesn't have something suitable. They may not be quite as fast as the PVS-14 lens, so you might end up at more like 1.2X, but it can be made to work. The Televue/TNVC adapter may or may not work, more likely it won't work. To add a filter to a camera lens, you need to have a filter that is almost as large or larger than the front element of the lens, and you need a way to mount it on the front of the lens. Buying h-alpha filters larger than 2" is very expensive, but you can find them custom made if you want them. Using a Mod3/3c provides more flexibility in use, since camera lenses are an option, but you have to be willing to tinker, find adapters, and possibly find in-focus in order to get it to work. Also the window on the unit is exposed. PVS-14
I personally use a PVS-14 with a 1x and 3x lens, and I use it afocally with TeleVue eyepieces and and the TNVC/TeleVue adapter. A PVS-14 has a high-quality, fast 1x lens attached. The lens is not user removeable, and the unit is purged with nitrogen to prevent internal condensation. This is one reason that suppliers can provide a longer warranty for these units. You simply attach the NV unit to the TeleVue eyepiece with the adapter and the focus position is essentially the same as visual use. The TNVC adapter locks onto the eyecup groove on TeleVue eyepieces in the same manner as the Dioptrx attaches. So, if your eyepieces focus for visual use, then you will have no problem using the NV unit afocally. Just attach and enjoy. I bought a 3X lens (from TNVC, there are other cheap imitations that aren't as good) that attaches in front of the 1X, and it works very well. That, combined with all of my telescopes (including some smaller refractors) and a 55mm Plossl, 42 Panoptic, 31mm Nagler, and 27mm Panoptic means I have lots of magnification optics from 1X and up, and I have no need or want to use camera lenses at this time, so I have a PVS-14. Filters are simply screwed into the eyepiece, or you can use a filter slide that puts the filter just under the eyepiece, just like normal Newt operation. I use my 2" h-alpha filter on a home-made adapter that goes over the 1X lens. I also made an adapter for the 3X lens, though the filter cuts its aperture slightly. Other notes
You can now buy the PVS-14 NV unit from TeleVue, as the thread pointed out. I bought from TNVC because I know Vic, the owner, who is also an astronomer, and they have a 10-year warranty for these sealed units. For afocal use, you will want the NV unit, the TeleVue/TNVC eyepiece adapter, and also a narrowband h-alpha filter. I like a 5-7nm bandwidth, 2"-diameter H-alpha filter. It threads right onto the 2" eyepieces that I use afocally. Currently the only narrowband filter that I have is a 2" Baader 7nm H-alpha filter. I also may buy a 2" Astronomik 6-nm H-alpha filter in the future. I recommend the 55mm Plossl, 41mm Panoptic, and other eyepieces that have ~19-20mm of eye relief or more. (Note that the Ethos and Nagler zooms won't work, as well as higher power eyepieces in many of the different lines/types.) See all TeleVue eyepiece specs here: TeleVue Eyepiece Specification Page I prefer lower power views, and I rarely go to powers higher than a 27mm Panoptic because images will become fainter. I have a 17mm Delos that works nicely for higher power because it has lots of eye relief. September 2019 At Okie-Tex 2019 I spent quite a bit of time taking images with my NV unit. I took the whole stack (41mm Panoptic, 2" Baader 7nm h-alpha filter, TNVC adapter, custom made camera mounting bracket, and my Canon G15 camers) and moved it between my 14.5" f/2.55 (a.k.a. "Stubby) and Ed Allen's 24" f/2.75 (a.k.a "Elvira") for various viewing and to take some photos. Ed's 24" scope had a 2" filter wheel positioned below the SIPS, so we put my Baader filter in there to compare with Ed's 2" Astronomik 6nm filter, as well as a Celestron UHC/LP filter that both of us have. I didn't always think to take unfiltered images of the objects, but I have included those when I had them from my 14.5" f/2.55. Most of the information about the images is included in the two mosaic images below, so I'll let those do the talking. The first mosaic contains images of brighter objects. 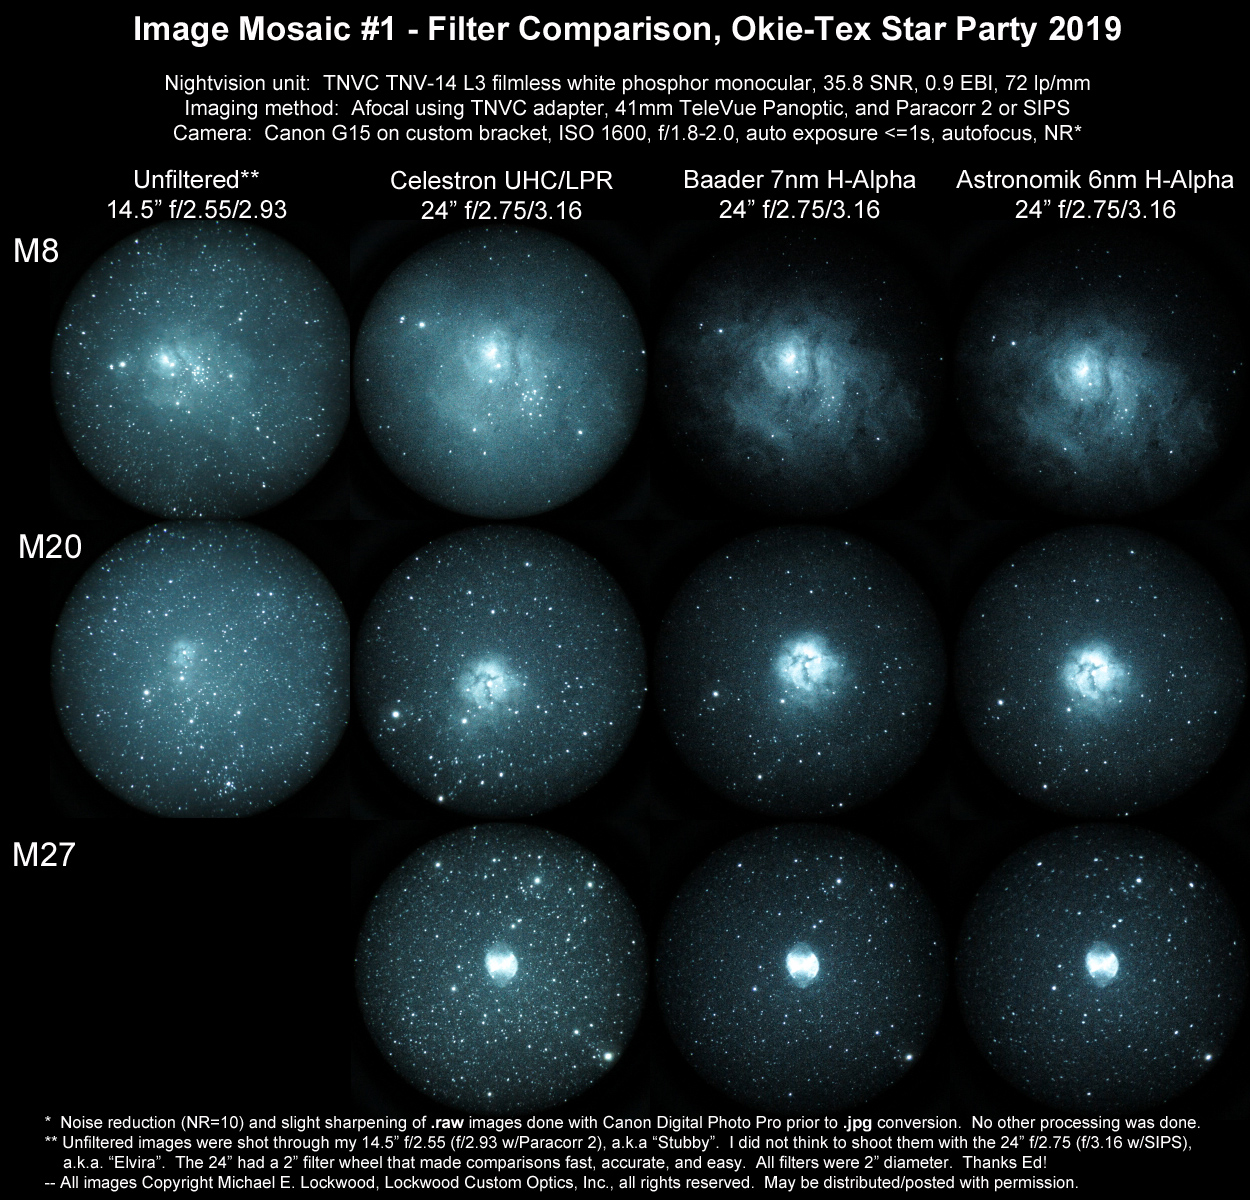 The second mosaic contains images of two fainter objects. 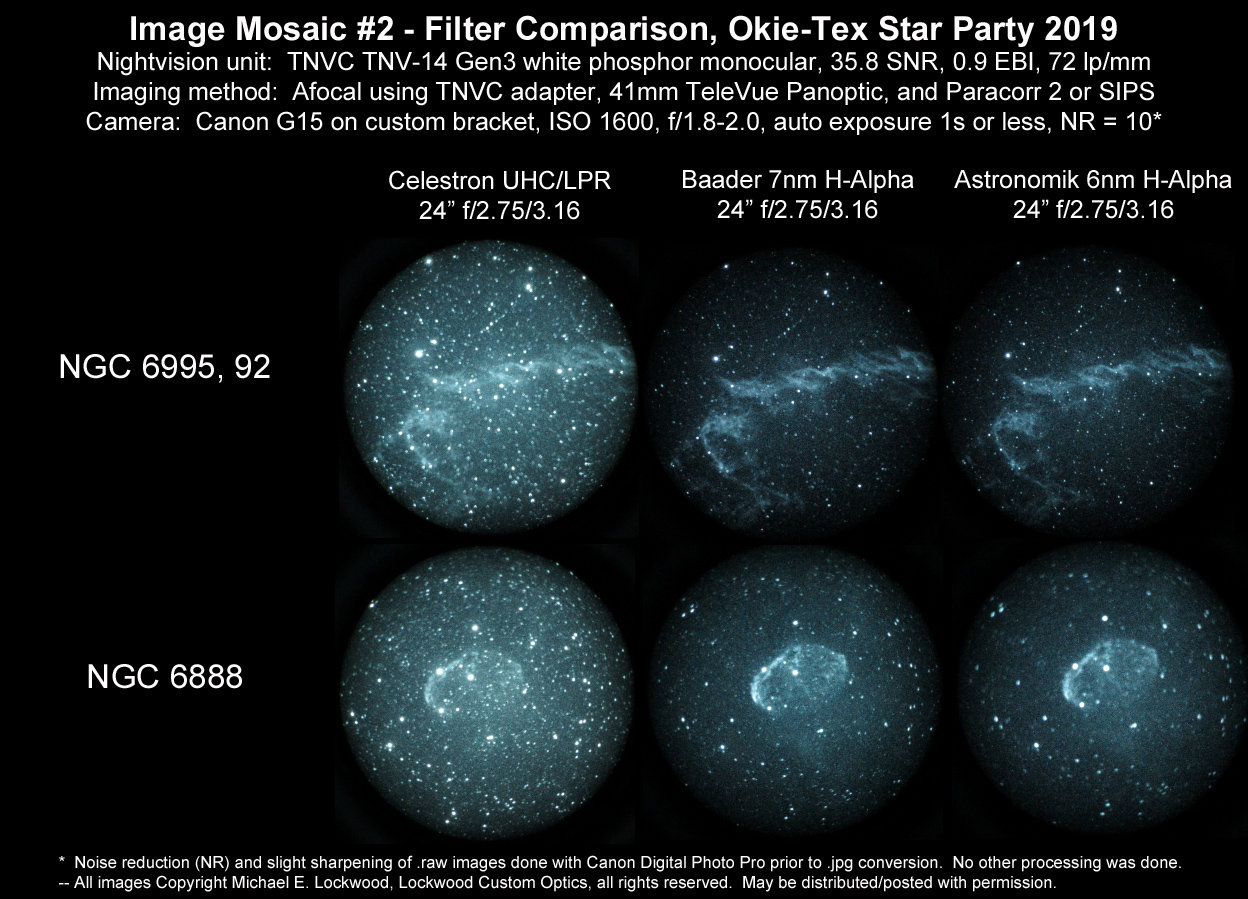 Any defocus seen is due to my attempts to focus using the live-view on the camera. I have to improve this in the future. The camera then auto-focused as best it could. The Celestron UHC/LP filter definitely enhanced the view of these objects compared to unfiltered. In the second mosaic, those objects just generally don't show much without a filter, and that is one reason I didn't shoot that image, though I should have. Conclusions? For me, for nightvision, the Baader 7nm h-alpha provides images that are almost identical to the 6nm Astronomik. At half the price, I can buy two Baaders and put one on my attachment for 1X use and just leave it there. That is probably what I will do. Please understand that in more demanding applications like long-exposure imaging, there may indeed be differences in the filters, but for NV use, I can't see them. I have measured both filters with my spectrometer, and on-axis the transmissions are with 1-2% at the peak and the passband shape looks good. When I have measured the Optolong filters, they have some off-band leakage that the Baader does not. So, for now, though, I find the Baader to be a bargain, at ~$300 from US suppliers and less than that direct from Baader or from other European suppliers. I would very much enjoy comparing a 5nm filter to my 7nm, and if I find someone that has one who is willing to let me compare, I will do that comparison when I can, but preferably when I have a filter slide or wheel available to minimize handing of the filters. For other images and more stories from the star party, see my Okie-Tex 2019 article. October 2019 I recently saw a friend post about his neck hurting after observing, and I wanted to official coin the term "Nightvision Neck", which I am defining as when your neck hurts after observing with a NV device at an invonvenient angle, because you just can't stop looking high in the sky because there is so much stuff to see. Also, I wanted to post a link here to a page of filter measurements, broadband and narrowband, that I have just posted: Filter transmission measurements February 2020 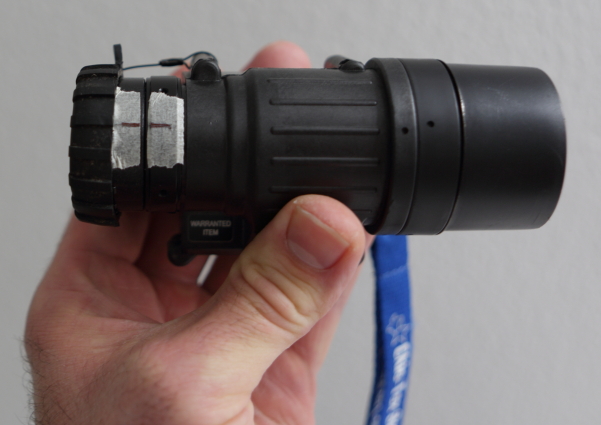 I
have noticed some variability in the quality of images when I use my NV
unit with wide field eyepieces like the 55mm TeleVue Plossl.
The
outer part of the field will never be perfect, but some images seem to
come out better than others. I believe this is because the focus
of
the 1X
objective is being inadvertently changed while eyepieces or adapters
are being attached or removed. The objective is focused by
rotating/twisting it relative to the rest of the NV unit body. I
have noticed some variability in the quality of images when I use my NV
unit with wide field eyepieces like the 55mm TeleVue Plossl.
The
outer part of the field will never be perfect, but some images seem to
come out better than others. I believe this is because the focus
of
the 1X
objective is being inadvertently changed while eyepieces or adapters
are being attached or removed. The objective is focused by
rotating/twisting it relative to the rest of the NV unit body.For best image quality, it is important to make sure that the focus on your nightvision unit is set to infinity focus, which means that a sharp focus is seen on stars. One way to ensure that it is properly focused is to make some reference marks on tape. Focus critically on a star and then make marks on the tape, and you're set. After changing something, double check that the reference marks are aligned and you are good to go. See the photo at right for my tape marks. Obviously the objective is on the left, eyepiece on the right. 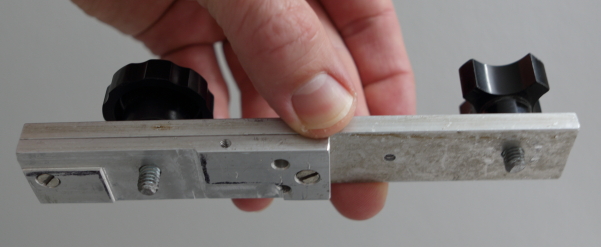 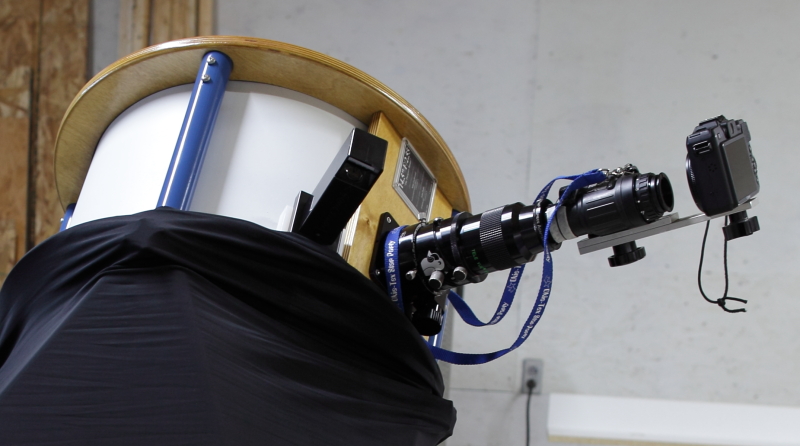 I
got tired of inconsistent results holding my Canon
G15 up to the NV
eyepiece, so when I had a little bit of time I made a bracket to hold
it there. It attaches to the NV unit and the camera
via 1/4"-20 standard tripod thread knobs that screw into the
camera and NV unit, holding them firmly and the proper distance apart.
See the photo above left. I
got tired of inconsistent results holding my Canon
G15 up to the NV
eyepiece, so when I had a little bit of time I made a bracket to hold
it there. It attaches to the NV unit and the camera
via 1/4"-20 standard tripod thread knobs that screw into the
camera and NV unit, holding them firmly and the proper distance apart.
See the photo above left.The camera rotation is simply adjusted by eye so that the lens lines up with the NV eyepiece. I remove the rubber eyeguard for taking photos, and I often don't use it visually either. The photo at right shows the assembled eyepiece, NV device/unit, and my Canon G15 point and shoot camera. A strong focuser (like a FeatherTouch) has no problem holding this long assembly. The photo below shows the entire unit - eyepiece, adapter, NV unit, bracket, and camera all attached and in the focuser of my 14.5" f/2.55 telescope. Note that the lens is retracted, so there is space between the camera and NV unit eyepiece. To take photos, I verify the focus position with the tape marks mentioned above and then use a remote shutter to trigger the exposure. Normally I have the camera set to Av, or Aperture Priority, with the f/# set as low as I can get, which is typically f/1.8 to f/2.0. This yields an exposure of about 1.0 s at ISO 1600, and this usually produces a useable image. For bright objects, the exposure may be shorter. I focus the telescope using live view, and then the camera does autofocus just before the exposure. The f/# for this camera depends if I have zoomed in a little bit with the camera lens. Zooming extends the end of the lens closer to the NV eyepiece and increases the f/#. If I zoom too far it will bump into the NV unit, sense an error, and self-retract. This setup took all the photos in my Okie-Tex Star Party 2019 article and my Winter Star Party 2020 article. It's the best thing that I have at the moment. I may look for a better camera option in the future, but for now I haven't exploited all of what this one can do. I tried using the alternate Canon firmware called CHDK, but I have been unable to get it to behave as I wish, and aperture priority mode in the camera has produced the best results. Finally, TeleVue is working on an interesting option for the 55mm Plossl. Here is what they sent me: "If you want to maximize the true field of view you can see with your night vision device (NVD), plus feed it more light to amplify, Tele Vue has developed an accessory lens for its 55mm Plössl which will do just that. The 55mm Plössl provides the largest true field available in a 2” format eyepiece with a 50° apparent field of view (AFoV). However, currently your NVD can only see 40° of the Plössl’s 50° AFoV. In order to reduce the AFoV to 40° to match the NVD objective’s field, the accessory lens reduces the eyepiece’s focal length to 67mm. This reduction has the equally important benefit of increasing the exit pupil size to 67mm/telescope focal ratio. The lens simply threads into the existing internal threads of the 2-part eyeguard housing and is just as easily removed for non-NVD viewing. (This lens is intended for use with NVDs only as there is no benefit otherwise.)" WSP Addendum A few NV images taken in the Florida Keys didn't quite make it into my WSP article (linked above). These are of the very large Vela supernova remnant with Canopus at right (below, top left), the Seagull with Sirius in the frame (below, top right), and two images of Orion, Barnard's Loop, and Sh2-264 (below, bottom left and right). These were taken by hand holding the PVS-14 and camera bracket assembly against the top of my tripod. I had meant to drill a hole in the bracket so that it could be mounted on a tripod, but I had forgotten to do that. So I made the best of it. Sh2-312 was also visible in Pyxis, but I didn't take any images of it. So, this is what my Canon G15 will do at f/1.8 and ISO 1600 with exposure limited to one second due to the camera software. I can't find a way to get a longer exposure.  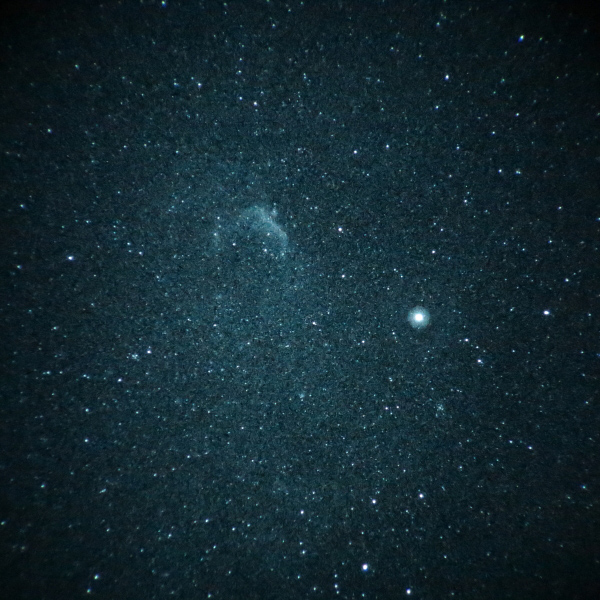 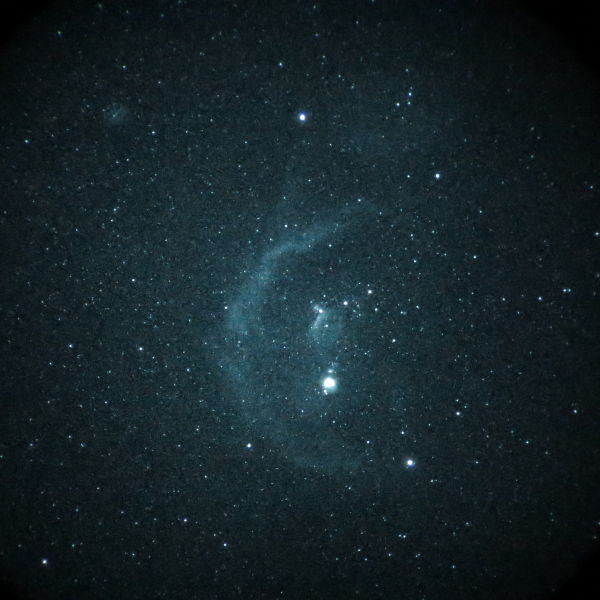 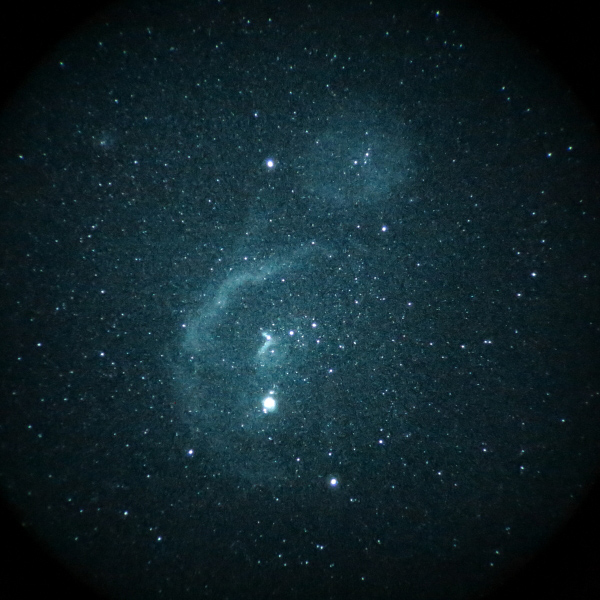 I miss the warm southern skies already. April 2020 - "Stay at home" and play with nightvision when I can I've been working on a few nightvision-related projects while I wait for this mess to end. That's OK, I am getting many optics finished and I'm even catching up on house and shop projects that I have put off for years. I can't complain. So let's see..... First, I machined out my eyepiece adapters to about a 21mm inside diameter. As a friend suggested, I removed the plastic ring, screwed the two pieces together, and then put some tape around the adapter. Then I gently clamped it in the chuck of my lathe and opened up the inner diameter. 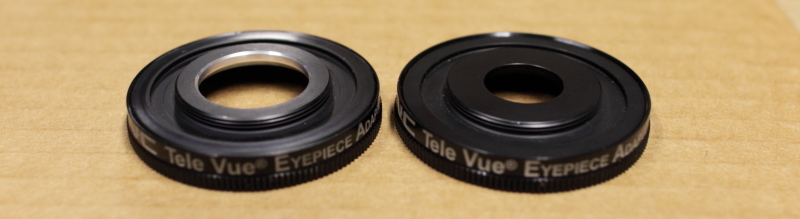 In the image above, note that the adapter on the left has a larger inside diameter than the one on the right. Don't get me wrong - for most people, the adapter on the right is completely sufficient, but I have some freakishly fast telescopes (14.5" f/2.55, 20" f/3.0, future 10" f/3.0) that produce a larger exit pupil, and thus the aperture must be larger to allow them to get through. My 14.5" f/2.55 has a ~19mm exit pupil when used with the TeleVue 55mm Plossl, so I have a bit of wiggle room to allow for the TeleVue lens that improves the field quality of the 55mm and increases its focal length a modest amount. I purchased two new filters, a 2" Baader 610nm longpass to help darken the sky a bit. I also bought a 2" Antlia 3.5nm bandpass H-alpha filter. I measured both filters with my spectrometer, and the updated results are now on my page of Filter and Optical Coating Measurements. Initial tests at 1X with my PVS-14 showed improved performance on nebulae as the summer Milky Way was just starting to get above the horizon on a clear early April morning. These two filters, along with a Baader 7nm H-alpha and a Celestron UHC/LPR filter, will be in the filter slide of my future 10" f/3.0 dedicated nightvision telescope and maybe interchangeable in my 20" f/3.0. My next project will be to see if I can improve my photography through the nightvision monocular eyepiece by using a different camera/lens to capture images. June 2020 - My first (maybe the first?) nightvision stitched panorama of the sky Ever since this year's WSP I have wanted to work on making wider-field images of the sky to show what nightvision can do. I haven't seen this done before, so I wanted to be the first, but it was not easy. I took a series of images during a run of beautiful weather in early June. I tried a couple of different pieces of software to stitch them, including Hugin and Microsoft ICE. I spent the better part of a day working with these programs. Each had their own advantages and disadvantages, but I can't complain since the images that I used were taken with a camera on a ballhead mount, and I only eyeballed the spacing of images. Here is the result - the stitching is not perfect, and there are darker areas due to vignetting of the camera lens, but it's a fairly good start. This is the southeastern sky, no filters used, 24 images stitched together.  I intend to re-do this image with an alt-azimuth tripod instead of a ball-head in order to avoid camera tilt and to more evenly space the images. Also complicating things is the new wind farm that has just been built about 10 miles southeast of me with blinking red lights (horizon, left of center). If shots aren't taken with the lights on, the stitching can become difficult. I also shot similar images with four filters on the same night, but those will be more difficult to stitch. I may re-do those as well in the future.  July 13, 2020 - 67mm "Plossl Plus" compared to 55mm TeleVue Plossl, Filter Comparison on M8, and a comet! As I write this, I am still very pleased with an excellent evening of observing last night. We set up my friend's 22" for testing, and I rolled out my assembled 20" f/3.0. After collimation, we were dive-bombed by junebugs as we waited for it to get dark. It was a beautiful night, temperatures were comfortable in July even though I had already put on long pants for the night, and the sky was beatiful and clear. Stars emerged, and I aligned my telescope. The date in my Sky Commander was June 14, another beautiful night last new moon when friends stopped by and marveled at the views through the nightvision unit. We had set up near the southeast corner of my house/shop, in a convenient location that blocked the light pollution to the northwest. Having seen comet NEOWISE the two previous nights, and because it was in the northwest, I hadn't planned to observe it, but I couldn't resist walking about 100 feet to the west with my PVS-14 monocular to have a look. I was stunned at how well the comet stood out, even in the fairly bright sky! I called my friend over, and he was amazed, too. So, despite having aligned the telescope, I quickly put the wheelbarrow handles back on and carefully rolled the telescope across my somewhat bumpy lawn in the dark to a position where the comet could be seen. Putting in the 67mm TeleVue eyepiece, a modified 55mm with TeleVue's clever adapter lens added, I had a look and I was stunned to see a great image of the comet, with the tails leaving the nucleus in two lobes! Back in 1997, I was lucky enough to have access to a CCD camera and a telescope at the Rose-Hulman Institute of Technology where we were was able to capture some images of the concentric shells of material around the nucleus of comet Hale-Bopp. Sadly I don't have those images, but it's nice to see a bright comet in a telescope again! The image at right was taken with my Canon G15 and my home-made adapter to attach it to the PVS-14 (or TNV-14). Exposure was 1s at f/3.2, ISO 1600. The telescope was not tracking because I hadn't bothered to realign it in its new location, but it wasn't needed. We gawked for a bit, then I removed the eyepiece / TNV-14 / camera stack and handed it carefully to my friend, and I slowly wheeled the telescope back to its previous setup location and realigned. My next task was to get some comparison images of the 67mm modified 55mm Plossl and the stock version. I had not had good weather or a good chance to do this since the lens had arrived, so I was eager to try. So, I dialed in one of my favorite starfields, M11 and the surrounding area, and I pressed the GOTO button. I took an image with the additional lens (making it a 67mm eyepiece), and then I removed it and shot the same field. Here are the two images, 67mm at left, 55mm at right. Focus was done as best I could with a not-quite-magnified-enough image on the live-view screen (a feature that I had only found with the use of the instruction manual for the camera), and while it was not perfect, it was close. As expected, the 67mm has noticeably better edge correction than the 55mm. Yes, the is some vignetting visible with the 67mm version, but some of that might be from the telescope itself. The 20" f/3.0 was built in 2009, before I anticipated nightvision use, so the closely-sized secondary may contribute a little to the darkening of the image at the edge. That's OK, though, I don't mind, the edge sharpening and wider field makes up for it, and some image processing software can help compensate if I wish. 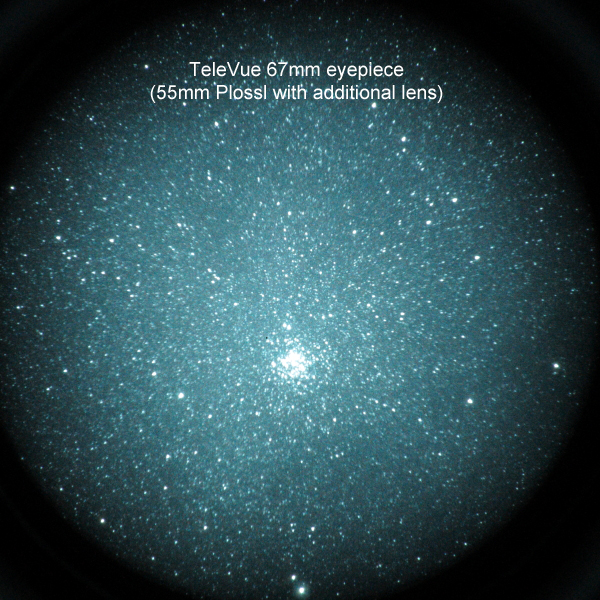 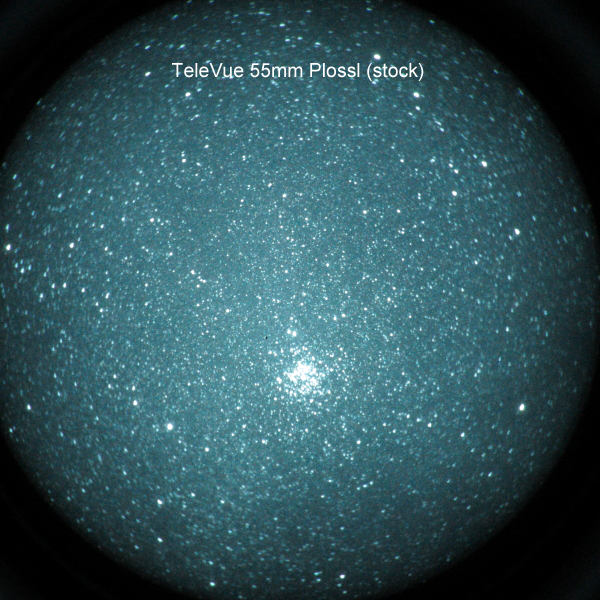 So that's it. It works. Nice work TeleVue. Next, I moved on to a filter comparison that I had promised to do since acquiring another H-alpha filter. I think that at this point I was having so much fun that I forgot to put the lens back in to make the 55mm into a 67nm, but that doesn't really matter for this sequence. From left to right, (first row), M8 through an Antlia 3.5nm H-alpha filter, a Baader 7nm H-alpha filter, a Celestron UHC/LPR filter, (2nd row) a Baader 610nm longpass filter, and no filter. This is from my backyard sky with an SQM reading of about 21.0 on a night like this one was. I screwed the filters directly into the bottom of the SIPS because this was quite easy for me to do with the telescope pointed down at M8. (Yes, I need a filter slide.) 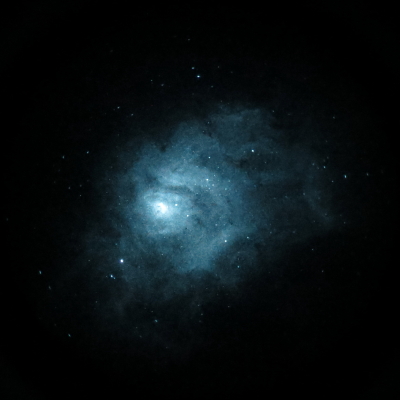 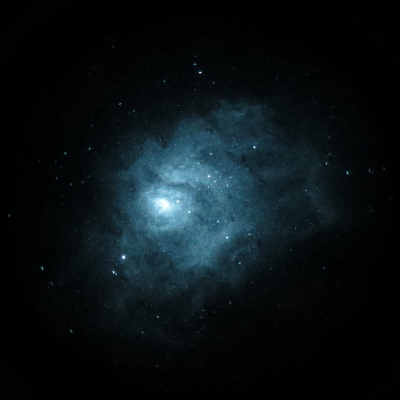    There may not appear to be a large difference between the 3.5nm and 7nm filters, but there is on fainter objects in the telescope and when viewing at 1X or 3X with the NV unit alone and a filter mounted in front of it. This comparison shows best the differences between various types of filters on a bright object, M8. The Celestron UHC/LPR shows a nice balance of nebulosity and background stars with NV. The Baader 610nm longpass helps bring out the nebula, which is not surprising because it is a red long pass filter, and the nebula is red. (I don't have a 685nm longpass at this time.) It is no surprise that the H-alpha filters show nebulosity best, but suppress stars in the field. I hope that is helpful, this includes all of the filters I have right now. The measured spectra of all of the filters are available on my Filter Measurement Page. With the telescope working well, I think that I finally remembered to put back in the lens, making the 55mm a 67mm again, and I decided to put the Baader 7nm filter back on the bottom of the SIPS and do a bit of a tour. I shot images of various objects with the 20" f/3.0 and 67nm TeleVue eyepiece. Al suggested calling it the 67mm "Plossl Plus", so I'm going to run with that, or the 67mm TV PP. Below, using the 67mm TV PP and 7nm Baader H-alpha filter, we have (row 1) the Cats Paw, M20, M16, (row 2) M17, the Gamma Cygni Nebula, and the Propeller Nebula.  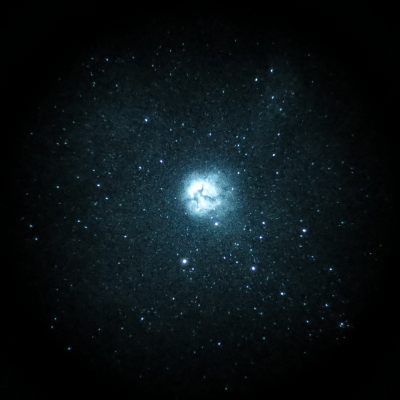 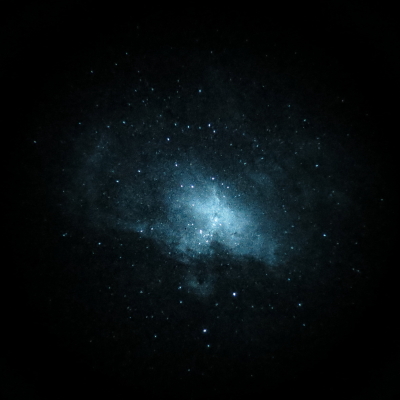 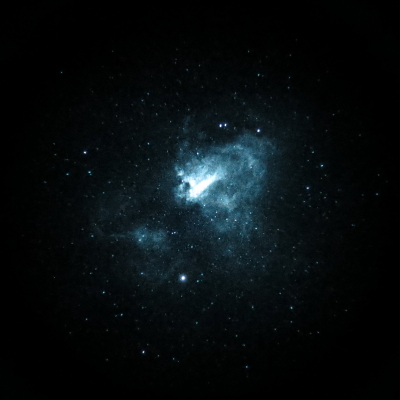 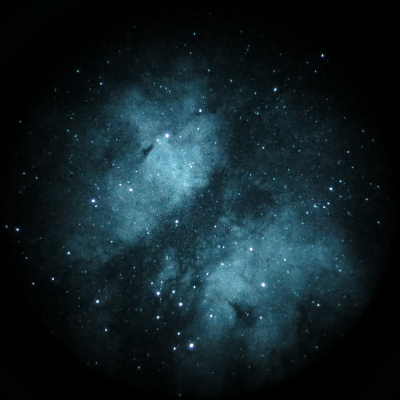  What a fun night! After the M8 photos were done, I had decided to just scan southern Scorpius and see what I came across, and we saw a small planetary, then the Bug Nebula (NGC 6302), and finally we went on the sky tour of the rest of the objects pictured above as I shot images. During this session I worked out a better method of focusing the camera and telescope, so I am pleased with the images. However, I still don't have the ability to focus really, really accurately (though I am not sure it is necessary), and those with devices (phones) that automatically average many images produce "smoother" looking images with less noise. For emphasis, I note that all images here are SINGLE exposures with no processing other than resizing, and I tried to use a lower ISO when possible, of course. By this time it was midnight and my friend had to leave, and I could have observed more, but I decided to call it a night. We brought the equipment in, my friend headed out with his 22" to take it home to make some improvements to it, and I had a good beer, smiled a bit as I thought of the images above that I had just captured, and stepped out on the deck under the stars while I finished my beer. It had been a great night, and I slept well. Recently nightvision was given its own forum on Cloudy Nights, and you can see it here: Nightvision Astronomy Forum, Cloudy Nights This concludes Part 1 - this page has become large enough, so I'll start Adventures in Nightvision - Part 2! More nightvision adventures to come..... stay tuned and don't forget to keep calm and keep your gain knob sensibly set! -Mike Lockwood, Lockwood Custom Optics |