Four Lessons in Mirror Testing
|
 2013 - A Testing Odyssey 2013 - A Testing OdysseyI have wondered for some time just how well my measurements of a mirror would agree with other shops that have careful, accurate testing procedures. My own testing, star testing, and high-power observing using mirrors that I have made has given me great confidence in my measurements, yet I still am curious. I'm an engineer, after all, and I can't turn off the curiosity and the drive to learn more. In an ideal world, measurements of the same mirror by multiple optical shops would match up almost exactly, within well-defined limits of precision of the measurements. Accuracy might vary between test methods, but readings should generally agree. Right? Yes? Well........... not exactly. Measuring a mirror is a lot more complicated than pulling out a set of calipers or a micrometer and making a measurement or two. Many things need to be done properly to get good data. Unfortunately, and somewhat sadly, the part of the world of optical testing that is usually frequented by amateurs is a confusing world that contains errors, misrepresentations, misconceptions, a few lies, and some amount of truth. Finding and confirming that truth can be incredibly difficult if you don't have experience testing optics. To start off, I have a few words of advice. (These are not the four lessons that the article is about, these are simply pieces of advice.) In general, I advise my clients to take test results with a large grain of salt. One should be suspicious of very high claimed Strehl ratios and/or very low claimed wavefront errors, especially for large mirrors. All test systems have some error, and if the system error or accuracy is not stated, that is a red flag. Also, remember that not all interferometric results are created equal, and what you may see or read may not take into account significant error within the interferometer or test environment that the optician may or may not be aware of. So, the test is only as good as the operator, equipment used, how well the equipment is set up and calibrated, and the operator's honesty and understanding. Also, I advise my clients to be careful when they see a reported/stated result that has too many significant digits. You may remember from high school that one should only present as many digits as is appropriate for the precision and accuracy of the measurement. So, if you see a claim of a Strehl ratio of 0.999, for example, you should ask yourself if the last digit or two are "real" or not - are they truly representative of what was measured? That is, what is the actual error in the measurement? Can the measurement be repeated, and will the number agree to within 0.001 (the difference between 0.998 and 0.999), or even 0.01, or the difference between 0.98 and 0.99? I can almost guarantee that it will not. In many cases, measurements of the same mirror by different shops/opticians produce Strehl ratios that differ by 0.1 or even more. Thus, one may not be able to discriminate between mirrors that have calculated/measured Strehls of 0.8 and 0.9. This may seem like a very large margin of error, but it is common in my experience. When two measurements don't agree, it is difficult to determine which one is incorrect, or if they both are! Also, remember that all observing reports are not created equal. Someone can rave about image sharpness, contrast, etc., but all of that is irrelevant and useless if the magnification and conditions are not described and taken into account. Using high magnification under good observing conditions is the way to evaluate optics critically. Low power will simply not do it. An observer must observe planets and other challenging objects in many telescopes under varying conditions on many nights before he/she truly develops a feel for what high-quality optics will do and should do. So, with a healthy dose of skepticism, and perhaps a refreshed understanding of significant figures, I hope readers enjoy the story of a 28" mirror that I made some time ago, and how it came to be tested in four different ways by me and in a fifth way by a qualified third party, and how all of the tests agreed within reasonable tolerances. It is a fascinating story that touches on multiple issues, including types of testing, mirror support, thermal distortion of a mirror's figure, and the structural properties of borosilicate. The truly important things discussed in this article are how a wide variety of factors and preconceptions can greatly affect testing and performance of a telescope, and how some of these factors and phenomema are not well known, even though they have been written about in professional literature. |
Murphy's Optical Law: Anything that can go wrong will go wrong, and the optician will be blamed. It is quite interesting how when something is wrong with a telescope, usually the optician is the first to be blamed. Many assume that there can be no other reason, but that's not correct. This is exactly why I wrote my earier article - "Why Aren't My Stars Round" - to help builders and telescope owners identify problems that they may be having with their instrument that are not due to the optics themselves. I'm not faulting clients or telescope builders for this, however. The reason is simple lack of information on the the issues that can pop up with telescopes, especially with large telescopes. There is no true textbook or manual for telescope building, despite the books and articles that have been published over the years. So, if there is no easily-identifiable cause for the telescope's problems, then the optician is naturally the first person to be blamed. So, rather than criticize clients or builders, which would almost certainly be unpleasant and unproductive, I offer solutions and suggest improvements based on my ten years of experience fixing telescopes and observing with them. Sometimes people listen to my suggestions, sometimes they do not. I have built and worked on many telescopes, mirror cells, secondary holders, and other components over the years, and have learned a lot about what can and often does go wrong. The results have been the article mentioned above, much improved mirror cells in recent years, and more attention paid to carefully mounting secondary mirrors. Here I will go through the process of testing and improvement that took place on one particular 28" telescope that was having some performance issues. Some initially believed that the optics might have been overcorrected and possibly astigmatic, and clearly something was wrong based on the observing reports. The primary mirror cell used a somewhat non-ideal cable sling edge support, and this concerned me. The secondary holder was the conventional shell type that can work well, but that can also cause optical problems if they do not fit properly or are not assembled just right. (This takes practice.) Let me point out something that has become clear to me over years of optical testing. The 24"-25" size of mirror is a sort of threshold. As mirrors go beyond the 24" diameter, they become significantly heavier quickly. As a result, they also start to bend more easily. Therefore both mirror cells and how they are supported during testing become more critical. It is important to realize this when one is testing 28" and larger mirrors, or the results can be inaccurate. I will touch on this more later in the article when I discuss testing by another party. I had the opportunity to re-test the 28" primary mirror that I had made when it was sent back to me for inspection. Yes, that's right, I had someone return a mirror to me. Now wait - before you go posting that on a forum with a name like "Overcast Evenings", please keep reading. 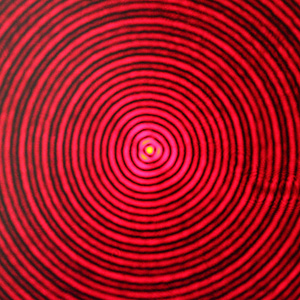 The
mirror arrived back at my shop, and I re-tested it as soon as
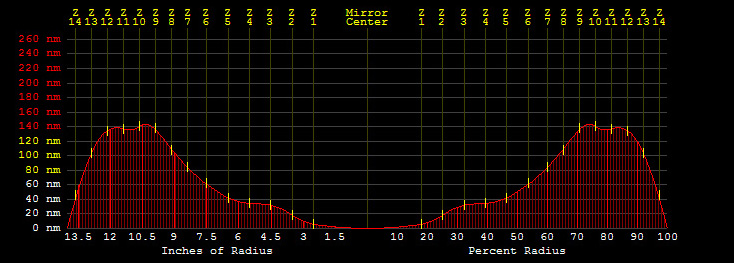
was possible, within a day of its arrival. Figure of revolution
testing (see figure at left) showed a nice, tight spot, quite good for
a 28" mirror. Slight variations in roundness are due to very
small air currents and edge support distortion. This is not a
quantitative test, it is a qualitative one that I have used for many
years, and this mirror passes easily. The
mirror arrived back at my shop, and I re-tested it as soon as
was possible, within a day of its arrival. Figure of revolution
testing (see figure at left) showed a nice, tight spot, quite good for
a 28" mirror. Slight variations in roundness are due to very
small air currents and edge support distortion. This is not a
quantitative test, it is a qualitative one that I have used for many
years, and this mirror passes easily.While Foucault measurements showed it to be a tiny bit more corrected than it did before it was coated, the primary mirror still tested as excellent. The slight change could have been caused by a slight variation in coating thickness. Interferometry showed a small amount of astigmatism that varied as the mirror was rotated. This is quite normal in large mirrors, as I knew, and is due to the imperfect nature of the glass itself (called anisotropy) and is not in the figure of the mirror. I'll discuss anisotropy more later in the article. Interferometry showed no other significant types of distortion in the mirror, confirming what I had seen with my figure of revolution test both before the mirror left my shop and in my most recent test at left.  Clearly, this
mirror had not been damaged, and was very good. I
knew that the secondary was quite good, because I had tested it in
thermal equilibrium and contact with my Zerodur reference flat before
it was
coated. A test image for the secondary is included at right, and
shows only slight convexity the test
across the minor axis. Testing across the major axis also showed
nearly straight fringes. This flat is not perfect, but it is very
good for its large size, and this means that it was not the
source of any astigmatism. Clearly, this
mirror had not been damaged, and was very good. I
knew that the secondary was quite good, because I had tested it in
thermal equilibrium and contact with my Zerodur reference flat before
it was
coated. A test image for the secondary is included at right, and
shows only slight convexity the test
across the minor axis. Testing across the major axis also showed
nearly straight fringes. This flat is not perfect, but it is very
good for its large size, and this means that it was not the
source of any astigmatism.So, both mirrors were good, but what was going on? The mirror's correction was quite accurate according to multiple sets of measurements, so the overcorrection was simply from a mirror that was cooling off. This is perfectly normal, even for Pyrex. Many think Pyrex is the perfect telescope mirror material, but it is not. Nearly all materials, including most glasses and Pyrex, shrink by a small amount as their temperature is reduced. The amount that a material shrinks or expands due to temperature is quantified by the material's coefficient of thermal expansion (CTE). The CTE of Pyrex is 3.25 parts per million per degree Celsius. That means that for every degree Celsius that the temperature falls, the size of a piece of Pyrex decreases by 3.25 parts per million. (Note: The CTE of plate glass is about three times higher than that of Pyrex, at approximately 9 parts per million per degree Celsius.) During most nights, the temperature is dropping, so the mirror will be cooling off most of the time. The outer edge of a mirror - literally the side of the mirror, in this case, a side 2" high - offers extra radiating area for heat to escape from, so the mirror cools faster there. Also, because the outer surface of the mirror is in contact with the air, the outside part of the glass cools off faster than the inside. Because heat cannot travel instantly through glass, this means that the temperature within the mirror is not uniform. Therefore, the cooler outer part of the mirror shrinks more than the warmer inner part, and the glass shrinks even more near its edge. This temperature imbalance in the glass itself causes enough of a change in the mirror's shape that it assumes a temporary shape that mimics an overcorrected mirror. This effect has been known for some time in professional circles, but most amateurs do not realize that it happens or understand why it happens. It is one reason many observatory mirrors are made from far more expensive materials, like Zerodur, which have a CTE of very close to zero. When mirrors made from these materials cool, the shape of the optical surface barely changes at all. The illustration below approximately illustrates the heat distribution within the mirror using color. Warmer areas are red and yellow, cooler areas are blue. The illustration also shows the distortion of the shape of the mirror that this creates. The distortion is exaggerated to get the idea across, and the concave curve of the mirror was left off to make things easier to understand. Some of the thermal distortion creates simple "power", or a change in focal length (imagers may know this effect well) which can be removed simply by refocusing. This alone will not affect image quality. However, faster cooling at the edge creates significant distortion in the shape of the outer part of the mirror, pulling the outer zones downward and increasing their focal length even more. When the outer zones focus longer than the rest of the mirror, this is effectively overcorrection of the mirror. The outer regions of a mirror have significant surface area - 50% of a mirror's area lies outside of the 70% zone/radius. So, the outer zones are extremely important in terms of optical performance, and distortion there will have significant effects on images. 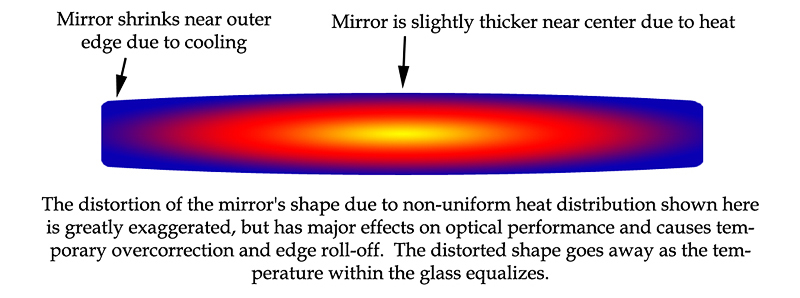 However, when the cooling inevitably slows down, the mirror gradually returns to its ideal paraboloid shape as the heat distribution within the mirror becomes more even. In fact, the mirror will return to its original shape when all of the glass reaches the same temperature as the air, a condition that is called thermal equilibrium. This is the normal behavior of a large, accurately-figured paraboidal telescope mirror that is made from Pyrex or Supremax (borosilicate glass). Good mirrors made from this type of glass SHOULD produce a star test that shows overcorrection while they are cooling, but return to very near neutral correction when equilibration gets close. The larger and thicker the mirror, the more pronounced and long-lasting this effect will be over the course of a night. Large mirrors, especially thick mirrors, may appear overcorrected to varying degrees ALL night. Simply put, if your large mirror gives a nearly perfect star test during strong cooling, then either you are misinterpreting the test, or your mirror is significantly undercorrected, or it is made from a far more expensive ultra-low expansion material like quartz, Zerodur, Cervit, etc. In addition to classic defocused-star testing, one should pay attention to the SIZE of the star image that the mirror forms at focus. It is often useful to compare views of a detailed object with a smaller telescope of known excellent quality. This provides a sanity check. It is not uncommon for a large telescope with a poor mirror to be outperformed by a superb telescope that is 1/2 or even 1/3 the size. If the smaller telescope produces more detailed images than a larger one on most nights, this is a sign of a serious issue with the larger instrument. One more important point should be made - it is only when the temperature within the glass is non-uniform that the mirror changes shape, and if allowed to equilibrate at ANY temperature, it always goes back to the shape it was polished to originally. So, for example, a mirror that measures perfectly in my 70º F shop will also measure perfectly in a 30º F environment AFTER it equilibrates, that is, after all of the glass cools down to 30º F. The only difference is that the mirror will be slightly smaller than it was at 70º F, but the shape of the optical surface will still be the same at the new temperature. I will also note here that testing a flat mirror in contact with a reference flat also requires thermal equilibrium if both pieces are not Zerodur or equivalent. Placing a warm Pyrex flat on a cooler Zerodur reference flat causes heat to be transferred to the Zerodur flat, cooling the front of the Pyrex flat and causing it to temporarily warp to a concave shape. As the heat within the two pieces of glass equilibrates, the Pyrex mirror changes back to flat. So, a period of equilibration and steady shop temperatures are necessary to accurately test flats in this situation. Failure to do this will result in erroneous test results. For more about equilibration effects and how to check your telescope for other types of problems, see this article. |
Is it hot in the center of that mirror? Why yes, it must be! To drive home the relationship between thermal equilibration and overcorrection, I decided to conduct an experiment to simulate the conditions under which the mirror might be used, and then to test it to quantify the change in its shape. I put the 28" mirror outside on a very hot day, covered up, in the shade. It was about 95º F outside, and the mirror was out for about several hours. It was very warm to the touch when I brought it into the ~72º F shop. The temperature difference between outdoors and shop was around 22º F, fairly similar to the typical temperature swing from day to night in many places. After about half an hour, the air currents had died down enough to allow testing with reasonable accuracy, and the mirror was tested. This thermal condition was similar to the condition that the mirror would be in after it had been outside after sunset for a bit, as the observers waited for it to really get dark. The mirror's external temperature at the time of testing was 83º F as measured with my infrared thermometer. However, due to the laws of heat transfer, the mirror was certainly warmer in the center, and therefore distorted by its own internal temperature gradient as shown in the colorful illustration in the previous section above. The two plots below show the error in the mirror's figure in thermal equilibrium (top) and while cooling rapidly (bottom). In both plots a perfect mirror would be represented with a straight, flat line, indicating an error of zero from ideal. The difference between the plots is remarkable, but remember, these are measurements of the same mirror - the only difference is that for one test, the mirror was cooling off rapidly. Note the difference in Y-axis scale between the two plots - the bottom plot has a much more compressed Y-axis (vertical axis). Though it may not look like it, the figure/shape error shown in the bottom plot is about seven times larger than the amount seen in the top plot. 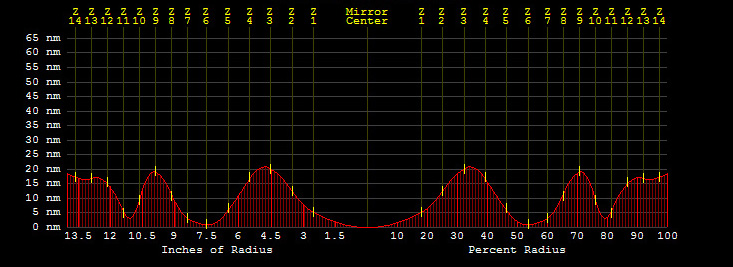 Test results - mirror
measured in thermal equilibrium in the optical shop - very small error
 Test results - mirror
exterior at 83ºF, cooling in 72ºF
optical shop - error is about 7 times larger
The top image shows that the 28" mirror tested out quite well when it was in thermal equilibrium. There was less than 1/10-wave of error on the wavefront according to the data analysis and based on the knife-edge measurements. To quibble over this or to state the error more precisely is pointless. Perfectionists and those who obsess over test results, get a grip, and NO, I will not tell you the Strehl ratio. This is simply a very accurately corrected mirror, as many independent sets of tests showed. The bottom image shows the significant change in shape that simple cooling can cause. Remember, this is the same 28" mirror, only it internally warm and is cooling off, and the type of error shown is a form of overcorrection. The cooling mirror tests about seven times worse than the equilibrated mirror. The error pictured in the bottom image is around 1/2-wave on the wavefront, and is entirely due to the heat/uneven temperature within the mirror. Interestingly, note that slight high spots at 10" radius and 4.5" radius are obvious in the equilibrated mirror results in the top plot, but are still subtly present in the warm mirror data in the bottom plot. The fact that these features come through even in the cooling mirror indicates that the Foucault measurements are of very good accuracy and precision. I am not aware of the results of this type of test (on a cooling mirror) being published or measured anywhere else in modern amateur astronomy literature. However, I know this was a significant problem and was documented quite thoroughly in the case of the cooling 200" Hale telescope mirror at Mount Palomar in a paper in 1950. Even with the cast cellular structure of the 200", the outer rim of the mirror was thick enough that non-uniform cooling caused the outer part to change shape by as much as two waves during sharp temperature changes. That article can be found here. Additionally, So, this phenomenon has been known in professional literature for at least 64 YEARS, but many amateurs who build, own and/or use large telescopes today in 2014 still don't know or understand the effects of cooling! In fact, I am also told by a very dependable source that G. W. Ritchey even noted the effect when working on a large mirror, either the 60" or 100" at Mt. Wilson, which were plate glass, and which would have responded with far more figure change than the Pyrex Palomar mirror. So, if simple heat affects the shape of the mirror by the amounts seen above, this means that star testing any mirror that is cooling is fraught with potential error and inaccuracy simply because the temperature distribution within the mirror is unknown. It cannot be measured from the outside without drilling a hole in the glass and measuring the internal temperature at various depths. Ultimately, this means that star testing, especially for large, thick mirrors, is difficult and involves largely guesswork, and thus it is the LEAST accurate form of testing discussed here. I am sorry to crush your dreams of star testing large mirrors to high accuracy (and driving your optician crazy), but it's not that easy. Thermal distortion is a pain in the rear, and, as mentioned before, it is the reason why many professional instruments use low expansion materials. (Lightweight blanks cool faster, but have their own very real set of problems.) So how does one minimize cooling time? I recommend that both the front and rear of a mirror be cooled symmetrically with fans to minimize distortion and cooling time. In addition to that, blowing a large box fan on the rear of the mirror early in the evening is also a popular and effective cooling strategy. This effectively simulates a strong breeze blowing through the mirror box, and may be useful to mix up the air in the area of the telescope well into the night. I very much like the front boundary layer fan centered on the front of the primary and suspended with wire, as can be seen in this image. This cools the front of the mirror more evenly than side-positioned front fans. It makes sense now... but it really doesn't. The measurement of the cooling mirror confirmed something that I had theorized some time ago. The measured error (showing overcorrection, or low outer zones) is nearly the inverse of the measured undercorrection error (outer zones that are too high) that I have seen in other mirrors that I have tested that have modern, thinner aspect ratios. A mirror with that undercorrected shape is significantly undercorrected on purpose, so that during strong cooling conditions thermal distortion of the mirror would cause it to become more corrected, and would get very close to the ideal parabolic shape. Actually, as I mentioned before, these mirrors can show a very nice star test while cooling. This improves performance when the mirror is cooling, although warm air currents coming off the mirror during the strong cooling would severely limit the performance of the telescope at that time. As an illustration, the figure error for a different mirror (of a different size) that appears to have been undercorrected on purpose is shown below. (Again, a perfect mirror would show no error, which would be a straight line across the bottom.) Note how the outer zones are high. These will shrink down while the mirror is cooling strongly, and the plot will become much flatter and much closer to the ideal. It is interesting to note that the amount of undercorrection is almost the same as the amount that the 28" overcorrected by cooling. Also, note that the transverse error is quite high, at nearly 17. This means that some of the light focused by the mirror is making a star image nearly 17 times larger than the ideal! 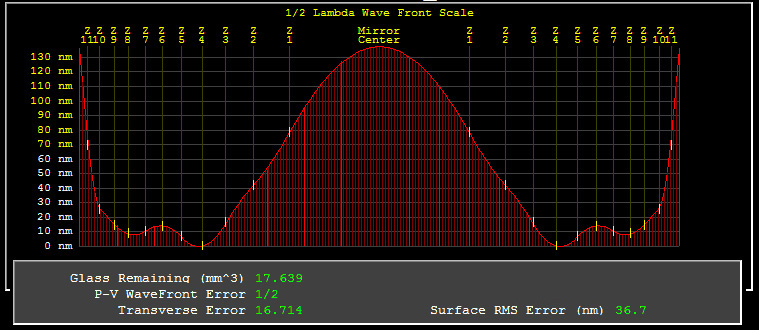 The fatal flaw is, as soon as the intentionally undercorrected mirror slows down in cooling, the shape changes back to that of a severely undercorrected mirror with a very large transverse (slope) error near the edge, as is shown in the error plot above. This causes bloated stars and poor performance after the mirror starts to equilibrate, when the BEST performance should be achieved! It is the optical equivalent of shooting yourself in the foot and trying to walk on it. This is why, in terms of resolution of detail, smaller telescopes can outperform a large instrument with a mirror like this. Update: I recently found a reference to intentionally undercorrected mirrors in Jean Texereau's "How to Make a Telescope", a very famous publication among amateurs. It appears in footnote 60, at the bottom of page 98 in the 1984 edition of the book printed by Willmann-Bell. Some background - Ellison is Reverend William Frederick Archdall Ellison, an Irish clergyman and telescope maker who wrote extensively on the topic in the early 1900s. Quoting Texereau: "Ellison
started a vogue for the partially parabolized mirror (e.g. 90 per cent
of theoretical longitudinal aberration) on the theory that it
compensates for subsequent temperature effects. Actually, this
could compensate only under exceptional circumstances, and cannot
justify a permanent, deliberate error. Be this as it may, the
theory has served for some as a convenient cover-up of imperfections
which in this way are made to appear calculated."
This book was published in 1951 in France, and I can only assume that the footnote was included in that edition. So, the effect of falling temperatures on mirrors and the inadvisable compensation for it were known by Texereau at that time, though he was mostly referring to the smaller mirrors of the time. The problem is, this notion has persisted since then. For some time, mirrors like the one tested above and other poor, large optics have given large telescopes a bad name. To this day, large mirrors (regardless of f/#) are still frowned upon by many observers because, based on their own past bad experiences using them and what they have heard from others, they believe that they can't be made to high standards, and can't perform as well as smaller mirrors. It is time that the truth - that quality aperture, no matter the f/#, always outperforms smaller aperture when conditions allow - is known. Bottom line - significantly undercorrecting mirrors to try to compensate for cooling may help improve performance while the mirror is cooling quickly, but it will severly harm performance under the best observing conditions when the mirror is becoming equilibrated. Mirrors figured to this undercorrected shape will NEVER perform close to as well as a fully-corrected mirror. Very small amounts of undercorrection are fine, though, so long as they do not significantly increase the size of the star image formed by the mirror. Obviously for cooling environments it is better to have a very small amount of undercorrection rather than overcorrection. Undercorrected mirrors have been made by many shops over the last 50-60 years. There is no one source to blame for it. The idea came from decades ago when thick mirrors took forever to cool, and thus fully corrected thick mirrors maintained their shape overnight. In that case undercorrection made some sense. However, the idea stuck with the amateur community, and has persisted through the years into modern times, times that have brought markedly thinner mirrors. For these thin mirrors, undercorrection no longer makes sense because mirrors are thin enough that they can get close to equilibrium during a night. As far as I know, all modern opticians now aim for fully corrected parabolic mirrors. That is the simplest shape to produce with test methods such as autocollimation. Amateurs in our era now have access to some of the best optics that they have ever been able to choose from, and more is known about how to properly support and equilibrate these optics. It is an exciting era for the hobby and science of amateur astronomy. Just for completeness, note that if a cool mirror were warming up, it would appear undercorrected. However, all amateurs know that cool mirror typically dew up quite quickly, ending the night's observations, so this situation would be quite rarely experienced by observers. To be thorough, some more tests were planned for the 28" mirror as some opportunities came up that don't come along very often. You can almost never have too much data, and at this point I realized the significant importance and relevance to amateur telescopes of the things that I was seeing and measuring. I had to proceed. |
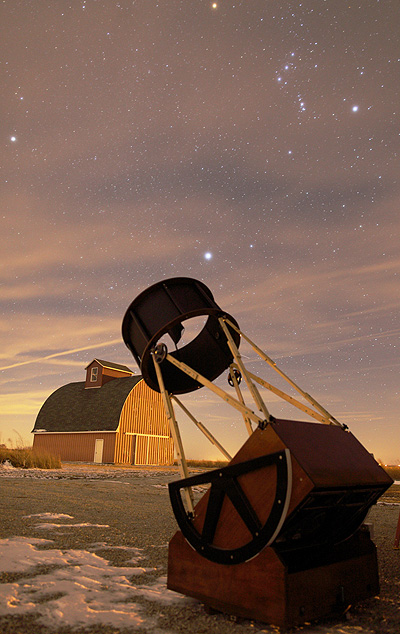
The coldest winter in decades, and I am observing I decided that I would test the 28" mirror under the sky. I asked John Pratte (of JPAstrocraft) to fabricate a 28" mirror cell that could temporarily fit in the 32" telescope that he was building at the time. This cell was of the moving-frame design, with whiffletree/roller edge supports. He also made some temporary wooden truss poles to shorten the scope. Below we see the scope in my garage, ready for a night under the stars. Note the counterweights attached to the truss poles, which I did to balance out the scope since the focal length of the 28" was shorter than the 32". 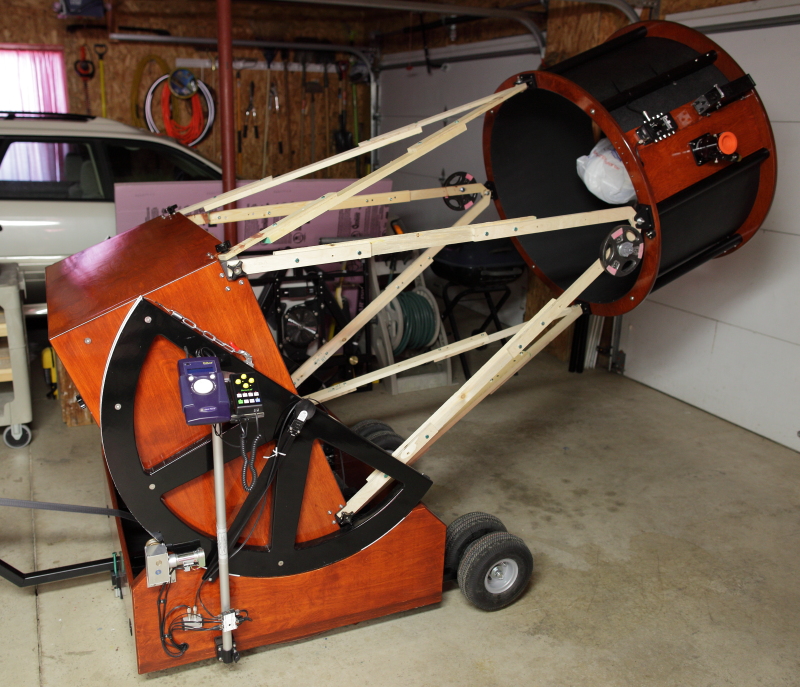 Star testing could finally be done when the scope was mostly completed in December, which, of course (lucky me), was during one of the coldest winters in decades. (Insert obscenity-filled tirade here.) On testing nights, I rolled the scope out of my ~40º F garage into the ~0º F (or below) and sometimes windy night air. Therefore the mirror experienced strong cooling, which is a good "torture test" because mirrors with strain usually show astigmatism while cooling. Rick Singmaster also used this "torture test" for optics that he was testing. Multiple nights of sub-zero testing showed absolutely round stars all night at powers up to 700x when the equilibration and seeing allowed, so clearly there was no significant strain or astigmatism present in the mirror, not even when cooling. I went to some trouble to record video of this, and it was not easy. It was recorded while the mirror was still cooling, so it showed overcorrection due to cooling, but it also showed very round stars. Star testing also showed overcorrection during cooling, which of course is expected, but the mirror began to show greatly improved correction after several hours of cooling, by around midnight or so. Yes, it takes that long for a large mirror to cool off by 40º F, because the scope had no fans at the time, though on some nights the wind did help cool the mirror somewhat. From my frigid driveway, I had some superb high-power views of Jupiter after the mirror had cooled for a while. Then I easily split Sirius and the Pup at 700x. Clearly the mirror was very good, and was forming tight stars. Yes, that is wind-blown snow and ice on the ground in the image below near the telescope, and Sirius ascending into the cold night. It still gives me a chill just looking at this photo. The image at the top of the article was taken on the same night. 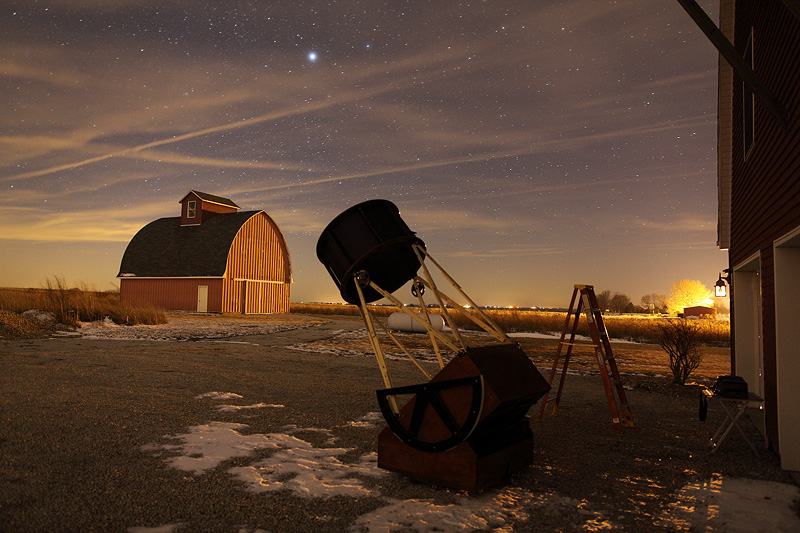 So, the late-night star testing results revealed that the mirror is pretty good in terms of correction. (Remember, star testing large mirrors for correction while they are cooling is far from an exact science.) The powers that I was able to achieve with no astigmatism (700x) indicate that the mirror was excellent in that respect. As the mirror cooled, images got better. This is to be expected. The trouble was, despite heavy winter clothing, I was cooling too, and I brought the frozen scope in at midnight on most testing nights. Perhaps most importantly, the complete lack of astigmatism observed in the star images proved to me that any astigmatism seen in the telescope had to be coming from a problem with the primary mirror cell or a secondary mirror that was pinched in its holder. Mirror support issues are more common than many people realize. For more information about diagnosing pinched or improperly supported optics, see this article. For more information about modern mirror cells and secondary mirror mounting, see this article. (coming soon) For a description and photos of the moving-frame mirror cell with whiffletree/roller edge support, the design that I strongly recommend for mirrors up through 32" in diameter, see the JPAstrocraft mirror cell page. The first image on that page shows the cell used for the 32" mirror testing described below. StarStructure Telescopes is also now using this edge support. Others have used the whiffletree design in the past, but without the rollers, which are an important improvement that John Pratte and I co-discovered some time ago. Back in the warmth of the shop - autocollimation testing Having the telescope and good mirror cells for two large mirrors available to me, I had a golden opportunity to test the 28" mirror and an old 32" mirror in the telescope by another method - autocollimation - in the controlled environment of my shop. Autocollimation testing is done with the telescope pointed at my 38" optical flat, and in this case an interferometer at the focus of the telescope. The photo below shows the telescope pointed at the flat, and the interferometer pointed into the focuser for testing. 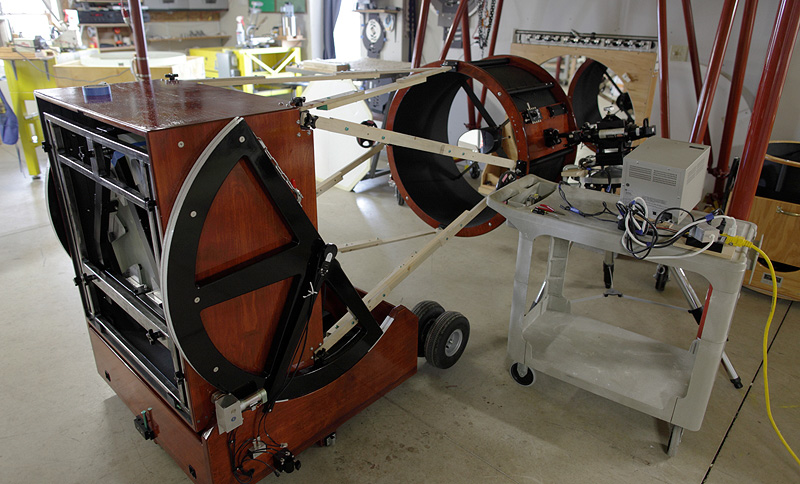 Now, keep in mind that this is a double-pass test, so errors on the mirror are multiplied by two, and the errors of the optical flat are included too, but are not doubled. Also, understand that gravity is at work here. Both mirrors, primary and autocollimation flat, are flexing due to gravity because they are both sitting on edge, the worst possible position for testing. This is the reality of testing large mirrors - gravity is a very real factor that must be accounted for, and most tests are done with the mirrors resting on their edges. Testing even a perfect large mirror on its edge without accounting for bending effects will produce a very low Strehl, simply due to gravity distortion. 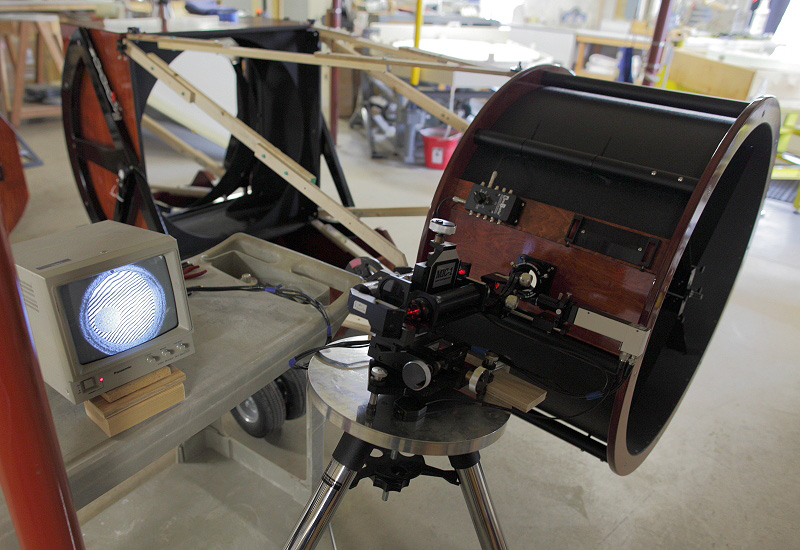 The photo above shows the interferometer on a tripod, pointed into the focuser. The black and white monitor at left displays the interferogram. When this image was taken, some air currents were disturbing the fringes, and I had to wait until those died out before I recorded the interferogram. I have learned that the best way to assess the mirror for correction while avoiding gravity-induced errors is to look at the straightness of fringes across a horizontal diameter or just above the horizontal diameter. Also, at this time I did not have a diverger fast enough to illuminate the fast cone for either of the mirrors, so I tested a portion of the mirrors. That is enough area to check the state of the correction, though - straight fringes indicate perfect correction. 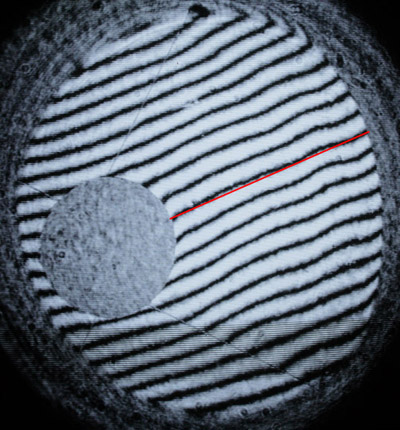 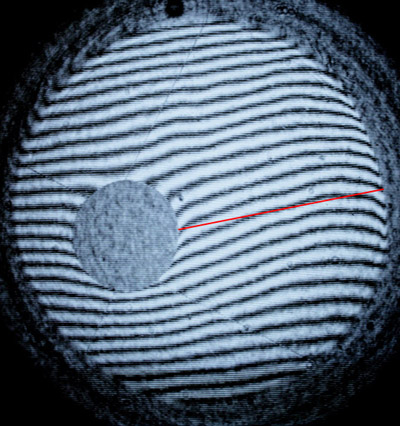 Accurately
corrected 28" mirror, autocollimation
Severely
undercorrected 32" mirror, autocollimation
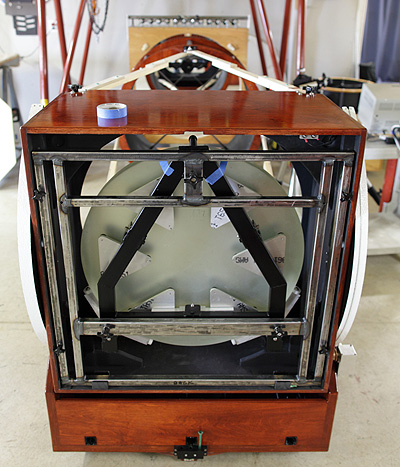 The
interferogram above on the left shows that the 28" mirror displays
nearly straight
fringes (compare them to the straight red line), indicating very
accurate correction (actually very slight
undercorrection). The image at right shows the rear of the 28"
mirror in the custom-made cell in the telescope. Some carefully
applied blue tape helps prevent mirror vibrations and keeps it in
contact with the rear supports of the cell. The whiffletree and
roller edge supports are visible at the bottom of the mirror. The
interferogram above on the left shows that the 28" mirror displays
nearly straight
fringes (compare them to the straight red line), indicating very
accurate correction (actually very slight
undercorrection). The image at right shows the rear of the 28"
mirror in the custom-made cell in the telescope. Some carefully
applied blue tape helps prevent mirror vibrations and keeps it in
contact with the rear supports of the cell. The whiffletree and
roller edge supports are visible at the bottom of the mirror.The interferogram above at right shows the old 32" mirror, which I am going to discuss for a bit here. It showed just over a fringe of curvature, indicating about a half-wave of undercorrection on the wavefront (double pass), which is unacceptable. The 32" was clearly one of those purposely undercorrected mirrors that I discussed before. When tested using Foucault, it also showed severe undercorrection, and had a calculated transverse error of about 15 when tested in equilibrium. This means that light from the outer zones was creating a "star" that was ~15 times larger than it should have been. I should note that this 32" is not the undercorrected mirror that I showed test results for in the previous section, but the form and amount of error were similar to that seen in the plot several figures above. Before the old 32" was fully corrected, it was used in the telescope to test the structure and cell under the sky. A faint triangularity was noted in the images, but generally star images were round. The star images were fairly large, though, so we thought the seeing was poor on the night we tested (yeah, I know, you've heard that before). Thus, we thought everything was generally good with the telescope structure and mirror supports. After refiguring, however, we put the mirror in the cell, and immediately saw mis-shapen star images resembling obtuse triangles. I knew this had to be a mechanical issue. A quick inspection yielded a tell-tale sound - the sound of mirror cell triangles rattling against the mirror! We quickly isolated the problem to two bolt heads in the mirror cell that almost cleared, but not quite, and were preventing all of the triangles from contacting the back of the mirror, resulting in severe distortion of the mirror's figure. (This is exactly why telescopes should be tested before they are turned over to the client!) We fixed the issue in about 10 minutes and star images became incredibly tight and round. The faint companion of Sirius, the Pup, was resolved quite easily, and Jupiter looked spectacular. Two friends who were present saw this, too. (If you ever suspect a mirror cell problem, always check to make sure that the mirror is sitting firmly on all of the mirror's support points.) The lesson here is that, before it was refigured, the 32" mirror was so undercorrected (unwisely done to improve performance while it cooled off, as was discussed above), that we could not see what was easily half a wave of distortion or more caused by a simple problem with the mirror cell! The seeing was not to blame for the bloated stars on the previous night of testing - the mirror was the problem. This proved unquestionably that the undercorrection was severly degrading the images produced by the 32", and that accurately corrected mirrors dramatically outperform those that are undercorrected on purpose. Therefore, the autocollimation test results for the 28" and 32" mirrors shown above match the star testing results for each mirror fairly well (again, star testing is the least accurate test method for large mirrors), and almost exactly match my Foucault testing results for each mirror. Thus, all three tests - Foucault, star testing, and autocollimation - agree for both the 28" and 32" mirrors. Some might wonder if not seeing the entire mirror in the autocollimation test would throw off the results. While it is true that astigmatism cannot be well characterized, spherical aberration is clearly visible in tests like this, and it cannot be focused away like power (defocus) is. This was proven by using the 32" mirror as sort of a control test to compare with the 28" testing. It is, and has been, common practice for decades in many professional shops to test less than a whole mirror/system in this manner to check correction, and it works. In fact, I did it to successfully test and figure a 50" R-C system. |
Confirmation It was decided to also send the 28" mirror to a third-party for evaluation. This was to be done by 4D Technology. They would use some of the most advanced interferometers in the world to measure the mirror, and subtract the spherical aberration to do a "software null" of the mirror. The products made by 4D are used in the University of Arizona Mirror Lab to test 8-meter and other large mirrors with very sophisticated metrology. They are designed to acquire data very quickly to, in effect, freeze air currents, and then many measurements are averaged to produce the final results. This speed of acquisition makes their products expensive. Luckily, in my shop I don't have significant air currents (I designed the shop that way), so I can use less costly, but still expensive, slower interferometric systems that will have similar capabilities and analysis techniques. The initial results from 4D were encouraging - they showed the mirror to have very close to the ideal amount of correction, but quite a bit of astigmatism due to standing the mirror up on edge for testing. I advised them on how to better support the mirror, and to lean it back a bit. I learned many years ago that mirrors should be leaned back a bit for testing. With changes implemented, the astigmatism was reduced. Every time the mirror was leaned back a bit more, the astigmatism was reduced more. This shows that the astigmatism is not in the figure of the mirror, and documents and illustrates the anisotropic properties of glass. Borosilicate (Pyrex or Supremax), especially large pieces, is not "perfect". It bends slightly more easily on one axis (in one direction) than another. This is referred to as anisotropy. This happens because the material is produced in sheets, and the properties vary slightly across the sheet. There is no way to avoid it unless one wishes to spend far more on other substrate materials. Putting a borosilicate mirror on edge with no support of the rear surface is asking for trouble. When that is done, a large amount of astigmatism is seen. This is because in this configuration, the astigmatism is mostly a function of the structural properties of the glass, which determine how the glass flexes, and is not in the actual figure of the mirror. Additionally, the mirror is being squeezed by the supporting sling, greatly amplifying the effect of structural variations in the glass. Imagine a piece of cardboard - it is fairly stiff under its own weight, but it will fold much more easily along one direction due to its internal corrugated construction. Put under pressure, it will flex or bend in that one direction. Glass can flex like this on a far more subtle scale. However, if you put the cardboard against a surface (or a mirror cell), it has some support, and will not flex/bend nearly as easily. The same is true of glass. Leaning the mirror back more and more puts more weight on the back support or mirror cell, and in effect strengthens it, greatly lessening the flexure caused by anisotropy. (Careful support and not using excessive pressures during polishing mitigate any polished-in defects due to anisotropy.) After leaning the mirror back as far as was possible in the test setup, which was still less than ten degrees from the vertical position, the astigmatism that rotated with the mirror was down to a mere 1/7-wave. I have no doubt that leaning it back more, as it always would be in a mirror cell, would reduce it even further. There is likely less than 1/8-wave of astigmatism in this mirror, which is absolutely outstanding in a mirror of this size. It is not possible to do much better than that without going to unreasonable lengths that will make mirrors far more expensive. So, the high-end interferometric testing validated that the mirror was very accurately corrected and had only a small, inconsequential amount of astigmatism, well below the threshold of what can be seen in visual images. In short, this is truly a superb mirror by anyone's reasonable standards, and all test results agree. |
Lessons learned and conclusion Clearly all of the testing showed that this was a very good 28" mirror. Ultimately a pinched secondary mirror was found to be the source of the astigmatism, and the secondary mirror was re-mounted in its holder, as I have written about in other articles like this one. This was definitely an improvement - the images now seen in the scope, showing greatly reduced or no astigmatism, are clear evidence that the secondary was pinched before. It is possible there is still some residual distortion of the secondary, though. I suspect that the primary mirror cell is still bending the primary mirror a little bit more than I would like. I recommended two changes to the cell - changing to the moving-frame design that nearly all of the telescope builders that I work with now use, and switching to a whiffletree and roller edge support. Such a design can be seen on the JPAstrocraft mirror cell page. I am not sure if those changes have yet been implemented, but I realize that it would take quite a bit of work to do so. The main lessons/points that can be taken away from this article are: 1) Accurately
corrected mirrors change to an overcorrected shape while
cooling because of thermal distortion of the glass. This is
normal. Therefore, star testing large
mirrors is difficult and requires practice, experience and favorable
thermal conditions.
1a)
After
initial strong cooling is done, the performance of a strongly
undercorrected
mirror is far inferior to that of a fully corrected mirror.
3) Foucault, interferometry, autocollimation, and star testing should all agree reasonably well when a thermally equilibrated mirror is tested, and the tests are done accurately and properly. Experience is required to properly do this comparison. For the large mirror discussed in this article, star testing was the least accurate test method discussed here. 4) Improper support/mounting of primary or secondary mirrors can and will cause significant astigmatism and other aberrations. (See this article for more information on how to spot this.) I hope that the reader has learned a bit more here about the factors involved in various types of optical testing, and has a greater appreciation for the sensitivity of optics to mechanical support. Gross or serious image problems that show up at even low powers are almost always due to some mechanical issue. Optical issues usually (but not always) are more subtle, and show up at moderate and high powers. I have spent many hours and nights at star parties helping clients and non-clients collimate and "debug" their telescopes. I have visited clients while on vacation to do the same thing. This is what I do for my clients, and I have never charged for it. I have made plenty of mistakes building my own telescopes, too. All of these experiences taught me something, and collectively gave me the knowledge to write "Why aren't my stars round?", an article which I am quite proud of. I want to help my clients get the most out of their optics, and I hope that this article is useful and educational, too. Stay tuned for the article about mirror support. Thank you to all of the people who took the time to read this article and give their feedback and advice to me. Clear, dark skies, warm weather, good friends, good seeing, and consistent optical tests. -Mike Lockwood, Lockwood Custom Optics Related links: Why aren't my stars round? A Modern guide to mirror support |